Quickstart - Import from URL
Convert a Figma design to frontend code in minutes—paste a URL, generate code, refine in Builder, and export.
Import from URL is the fastest way to get started with Locofy. Instead of installing the Figma plugin, paste a Figma design URL directly into the Locofy dashboard and generate frontend code in just a few clicks.
This workflow is ideal when you want to quickly convert designs into code without setting up additional tools or switching between multiple applications.
Paste a Figma URL → Convert to Code → Edit with Agent Mode → Export
Step 1: Create your Locofy account
Go to Locofy.ai and click Get Started. You can sign up with Google, GitHub, or email, then complete onboarding (name, role, and how you plan to use Locofy).
Your Locofy account connects your projects, generated code, and Builder workspace in one place.
Step 2: Open the dashboard
- Go to your Locofy Dashboard.
- Scroll to Start with Figma URL - 1 frame at a time.

Step 3: Generate your first screen
Paste the URL of your Figma file or frame and click Convert To Code. Locofy imports the design and starts conversion.

- Paste your Figma design URL into the input field—for example, a link to a specific frame or screen.
- Click Convert To Code to start generation.
- (Optional) Click How to get Figma design URL if you need help copying the right link from Figma.
- (Optional) Click Use a sample screen instead to try Locofy with a pre-built design.
If Locofy doesn't have access to the file yet, your browser opens so you can log in to Locofy and allow Figma access. Once connected, conversion continues automatically.
Locofy reads the linked design, analyzes layout and structure, and produces developer-friendly frontend code using its Large Design Models (LDMs). During this process, Locofy understands important design concepts such as:
- Components
- Design systems
- Variables
- Layout structures
- Responsive patterns
- Visual hierarchy
This helps generate frontend code that is much closer to how developers actually build applications.
Step 4: Review your project in Builder
When generation finishes, open your project in Locofy Builder—either from the success screen or your project list in the dashboard.
Locofy Builder gives you a live preview of your running generated code. As you make changes, both the code and preview update automatically in real time, so you can quickly iterate and validate changes before exporting.
From Builder you can:
- Visual Mode — review components, props, project settings, and structure. See Visual Mode.
- Agent Mode — refine and improve code using natural language prompts. See Agent Mode.
- Responsive preview — resize the preview to check layouts across breakpoints.
If you are new to Builder, start with the Builder tour for a walkthrough of the interface.
Step 5: Export options
Once you are happy with the generated output, export your code using the workflow that works best for your team.
| Option | Best for |
|---|---|
| Download code | Quick local setup or manual integration |
| Locofy CLI | Pulling code into an existing codebase with smart merge |
| Locofy MCP | AI-native editors like Cursor, Claude Code, and Copilot |
| Sync with GitHub | Team workflows with version control |
| VS Code Extension | Fetching projects and components inside VS Code |
Supported export options also include code downloads and supported web and native mobile frameworks, giving you the flexibility to continue development using your preferred tools.
When to use Import from URL
Import from URL is recommended when:
- You want the fastest path from design to code
- You don't want to install the Figma plugin
- You already have access to a Figma file URL
- You want to quickly experiment with Agent Mode and AI-powered refinement workflows
- You want to generate, edit, and export code entirely from within Locofy
Manage your plan
From the Locofy Dashboard Plan and Usage page, you can review your subscription, track LDMtoken usage, and manage billing—all in one place.
- Go to the Locofy Dashboard plan page.
- You can also open it anytime from the sidebar by clicking View Plan & Usage under Your plan.
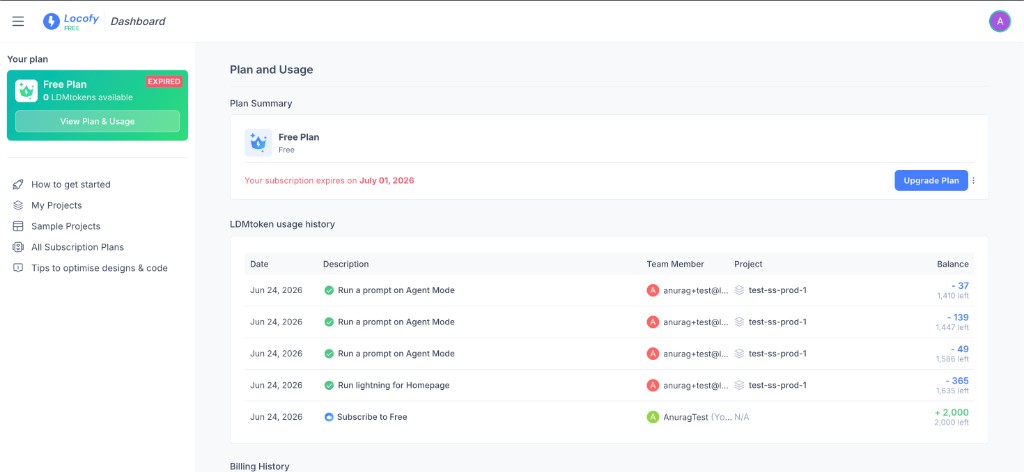
Plan summary
The Plan Summary section shows your current plan and subscription status, including when your subscription expires.
From here you can:
- Click Upgrade Plan to move to a higher plan
- Click the three dots (⋯) next to the plan actions to manage your subscription—for example, Cancel Plan, or update your payment method
LDMtoken usage history
The LDMtoken usage history table shows how tokens are consumed and added over time. Each row includes:
| Column | What it shows |
|---|---|
| Date | The day the tokens were consumed or added |
| Description | The action that used tokens (for example, running Lightning or an Agent Mode prompt) or credited them (for example, subscribing to a plan) |
| Team Member | Who performed the action |
| Project | Which project the usage belongs to |
| Balance | Tokens added or deducted for that action, plus how many tokens you have left |
Use this table to understand where LDMtokens are going and monitor your remaining balance.
Billing history
Scroll to Billing History to review past invoices and payment records for your account.
What's next
| Goal | Doc |
|---|---|
| Learn the Builder UI | Builder tour |
| Edit with Visual Mode | Visual Mode |
| Improve output with prompts | Agent Mode |
Prefer working inside Figma or Penpot? See the Plugin quickstart instead.