Create a YouTube Clone with Locofy.ai & Figma

Generate a 1:1 clone of YouTube from a Figma design using Locofy.ai for frontend and Youtube APIs.
This guide will take you step-by-step through the tasks required to turn your YouTube clone design into pixel-perfect React code that works with the YouTube API.
Prerequisites:
- You will need your design ready in Figma.
- You will need a Locofy.ai account and have the plugin up and running on your Figma file.
- You need a Google account to create an API key for the YouTube API.
Turn your designs into frontend code with Locofy.ai
In this guide, we will be creating a replica of the official YouTube app comprising of the homepage, search page, as well as video page.
This is the design for the app that we’ll be building.

The first step is to tag our designs. Tagging allows us to turn our designs into working components, for example, buttons, dropdowns, inputs, and more.
You can also work with popular UI libraries such as Material and Bootstrap by tagging your elements.

For this app, you’ll notice items like:
- Buttons
- Input fields
- Images
Now you can make your designs responsive by configuring the styles in the Styles & Layouts tab.
Select your components that need to be responsive and on the Locofy plugin, under the Styles & Layouts tab, you will find different media queries & states. Select the breakpoint you want to make your design responsive to and then change the styles and layout accordingly.
You can also use auto layout for your designs for responsiveness and use the locofy plugin to take care of layouts on different screen sizes.
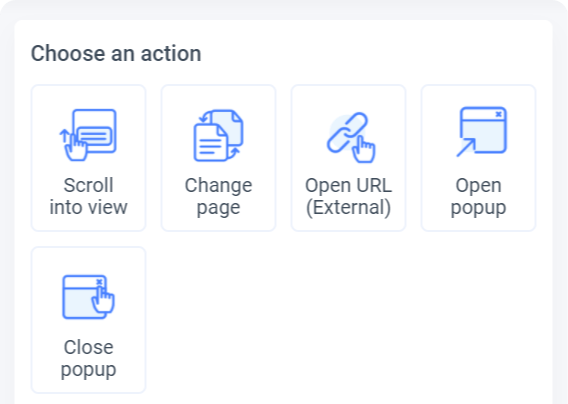
You can trigger actions to build fully featured apps and websites. You can head over to the ‘Actions’ tab and assign actions for click events.
You can scroll into view and open popups and URLs amongst other actions.
Now that our designs are tagged correctly and responsive, we can preview them.
To preview your design, select the frame or layer that you want to view, and click the “Preview” button.

Once you are satisfied with your preview, you can sync your designs to Locofy Builder to add more advanced settings, share your live prototype, and export code.
Click the “View Code” button at the bottom right corner of the plugin & select the frames. In our case, we’ll be syncing both frames.
Once the sync is complete, click on “View code in the Builder”.
You need to turn some of the code generated by Locofy into components inside the Locofy Builder for easier maintenance and fewer duplicate code.
In our design, we are using the same navigation bar in multiple places and thus, we should convert it into a reusable component.

You can also add the props quickly in the Locofy builder.
Once the prototype matches the product vision, you can view the live responsive prototype that looks and feels like your end product. Then you can export the code.

Make sure to select all the screens you need, as well as the correct framework and project settings. Once done, you can download your code in a Zip File by clicking the “Confirm Export” in the bottom right corner.
Exported Code Overview
After extracting the zip file you downloaded, you can see how the React project is structured.

You can see the components you created in the Locofy builder have been placed inside the components/ folder and you have got our screens as pages inside the pages/ folder.
- To run the app, you need to first install the packages running the "npm i" command in your terminal. Once the dependencies are installed, you can run the project in the development environment using "npm run start".
- Now that the application is up and running, you can check the responsiveness as well as the styles added using the Locofy plugin by visiting https://localhost:3000 URL on your browser.
Getting Started with the YouTube Data API
To programmatically fetch data & add YouTube functionality to your app, you need to use the YouTube Data API.
Let’s see how we can use this API.
Create a project in the Google Developers Console to obtain authorization credentials. This is required for your application to submit API requests.
Once you have created the project, you need to check if YouTube Data API is one of the services that your application is registered for. To do so, visit the Enabled APIs page, and in the list of APIs, make sure the status is “ON” for the YouTube Data API v3.
Click on the YouTube Data API list item and then click on the “Credentials” tab.

Now click on “CREATE CREDENTIALS” and choose API Key. We’ll need these credentials as discussed in Step 1.
After naming the API key, copy it into the .env file in your React project so we can safely access it in our app. Name the key “REACT_APP_API_KEY” as shown below:
Making API Calls
We’ll be making multiple API calls inside the useEffect hook so the calls are only made once the component is loaded.
To get started, open the ‘Homepage.js’ file and import the useEffect, as well as useState hook:
Create an async function in the useEffect() hook to fetch the data as shown below:
Here we have a fetchVideos() function inside our useEffect() where we are calling the API endpoint and passing in the API key we created earlier from our .env file. This endpoint gives us JSON which has a value called “items”, which is a list of recommended videos.
Since the data we get from the above call lacks the channel logos, we need to individually fetch the logo for each video present in the list. For this, create a function called getLogo() as shown above which will accept channel_id as an argument.
Based on the channel ID, we will be calling another endpoint and using the ID to get information about the channel. We can extract the logo by accessing the deeply nested response & returning it as shown below:Now you need to run this function over every item in the list and since this is an async function, you need to resolve all the Promises as well.
Finally, we can save this data inside a state variable which you can declare by placing this line of code outside the useEffect hook.
And to store the final list of videos, place this line of code after you resolve all the Promises of Step 3.
To easily manage the videos, we have split them into groups of 4 using a chunkArrayInGroups() function.
Locofy has already generated the code for all the video cards on the homepage and we can simply map the videos we have in our “videos” variable to these cards.
You need to make all the cards clickable so users can click on a video and navigate to the video page where they will be able to watch the video.
Therefore, add a click listener event to every card that will navigate to the video page and pass the ID of the video clicked by the user using the following function:
On our videos page, we can access the state passed using the useLocation() hook.
Similar to what we did in the ‘homepage.js’ file, we will be making multiple calls inside the useEffect() but to a different endpoint, using our “id” property in state: "https://youtube.googleapis.com/youtube/v3/search?part=snippet&maxResults=8&relatedToVideoId=${state.id}&type=video&key=${YOUR_API_KEY}"
Finally, you can map all of these data into all the relevant places inside the HTML returned by the function to create dynamic video pages. For example, in the iframe tag you can use the video ID in the following way:
Implementing Search Functionality
Using Locofy Builder, we generated a navigation bar component.

We are reusing the same component for every page. To get started, open the “YTSearchBar.js” file.
We can use the input field to collect user’s search query. To do so, first declare a state variable:
Now make the input field’s value update based on the “searchValue” and store the latest value using “setSearchValue”.
To submit the input, you can use the button provided next to the input field, which will trigger a handleSearchClick() function on click as shown below:
The handleSearchClick() function will simply navigate to the '/search-results' page using the useNavigate() hook and pass the search query in the state object as show below:
With that, we have successfully passed our user’s search query onto our search page. Now we need to make sure that the page is able to digest. Open up the “SearchResults.js” file in the “pages” folder.
To extract the state containing the search query, we need to use the useLocation() hook & use it inside our functional component.
To fetch the videos based on the search query, you can use a similar method to what we did inside our “homepage.js” file, except that the endpoint will be: “https://www.googleapis.com/youtube/v3/search?key={YOUR_API_KEY}&q=${state.searchTerm}&type=video&part=snippet&maxResults=12”
We are using the “state.searchTerm” to access the search query and passing it in the string literal to create a dynamic endpoint containing our query. We are also limiting the results to 12 items.
Like the “homepage.js” file, we are calling this endpoint in our useEffect() hook, and displaying the list of videos by using the “map” function in our JSX function to populate and return a list of cards that were generated by Locofy as shown below:
With that, you've successfully cloned the official YouTube web app.
By referring to the steps above, you can quickly go from design to extensible code that is able to show recommended videos, search for videos, and also play them.
With Locofy you will be able to generate production-ready frontend code in a matter of few hours that would have otherwise taken us 3-4 weeks to code manually. Moreover, as shown above, you can easily extend the code and work with APIs.
If you want to learn more about how to convert your Figma design to React, React Native, HTML/CSS, Nextjs, Vue, and more, check out our docs. Or explore our solution pages for an in-depth look at how Locofy helps you build apps, websites, portfolio pages and responsive prototypes effortlessly using our low-code platform with seamless AI code generation.