Building a Responsive Real Estate Website
In this blog, we'll build a real estate website from a Figma design with the help of Locofy Lightning. We will go from Figma to React code in just 1 click, where LocoAI will be taking care of making our designs responsive and interactive, as well as generating modular code with human-readable layers and class names.
What you'll learn:
- How to convert a Figma design into responsive React code with a single click.
- How LocoAI works behind the scene to create responsive and interactive code that is clean, modular and easy to maintain.
- How to leverage generated components and human-readable class names for easier code management.
- How to export and run your website locally.
Prerequisites:
- You will need your design ready in Figma. If you want to get started with an already Locofied design, visit our Figma community page.
- You will need a Locofy.ai account and have the plugin up and running on your Figma file.
Figma to high-quality React code in 1-click
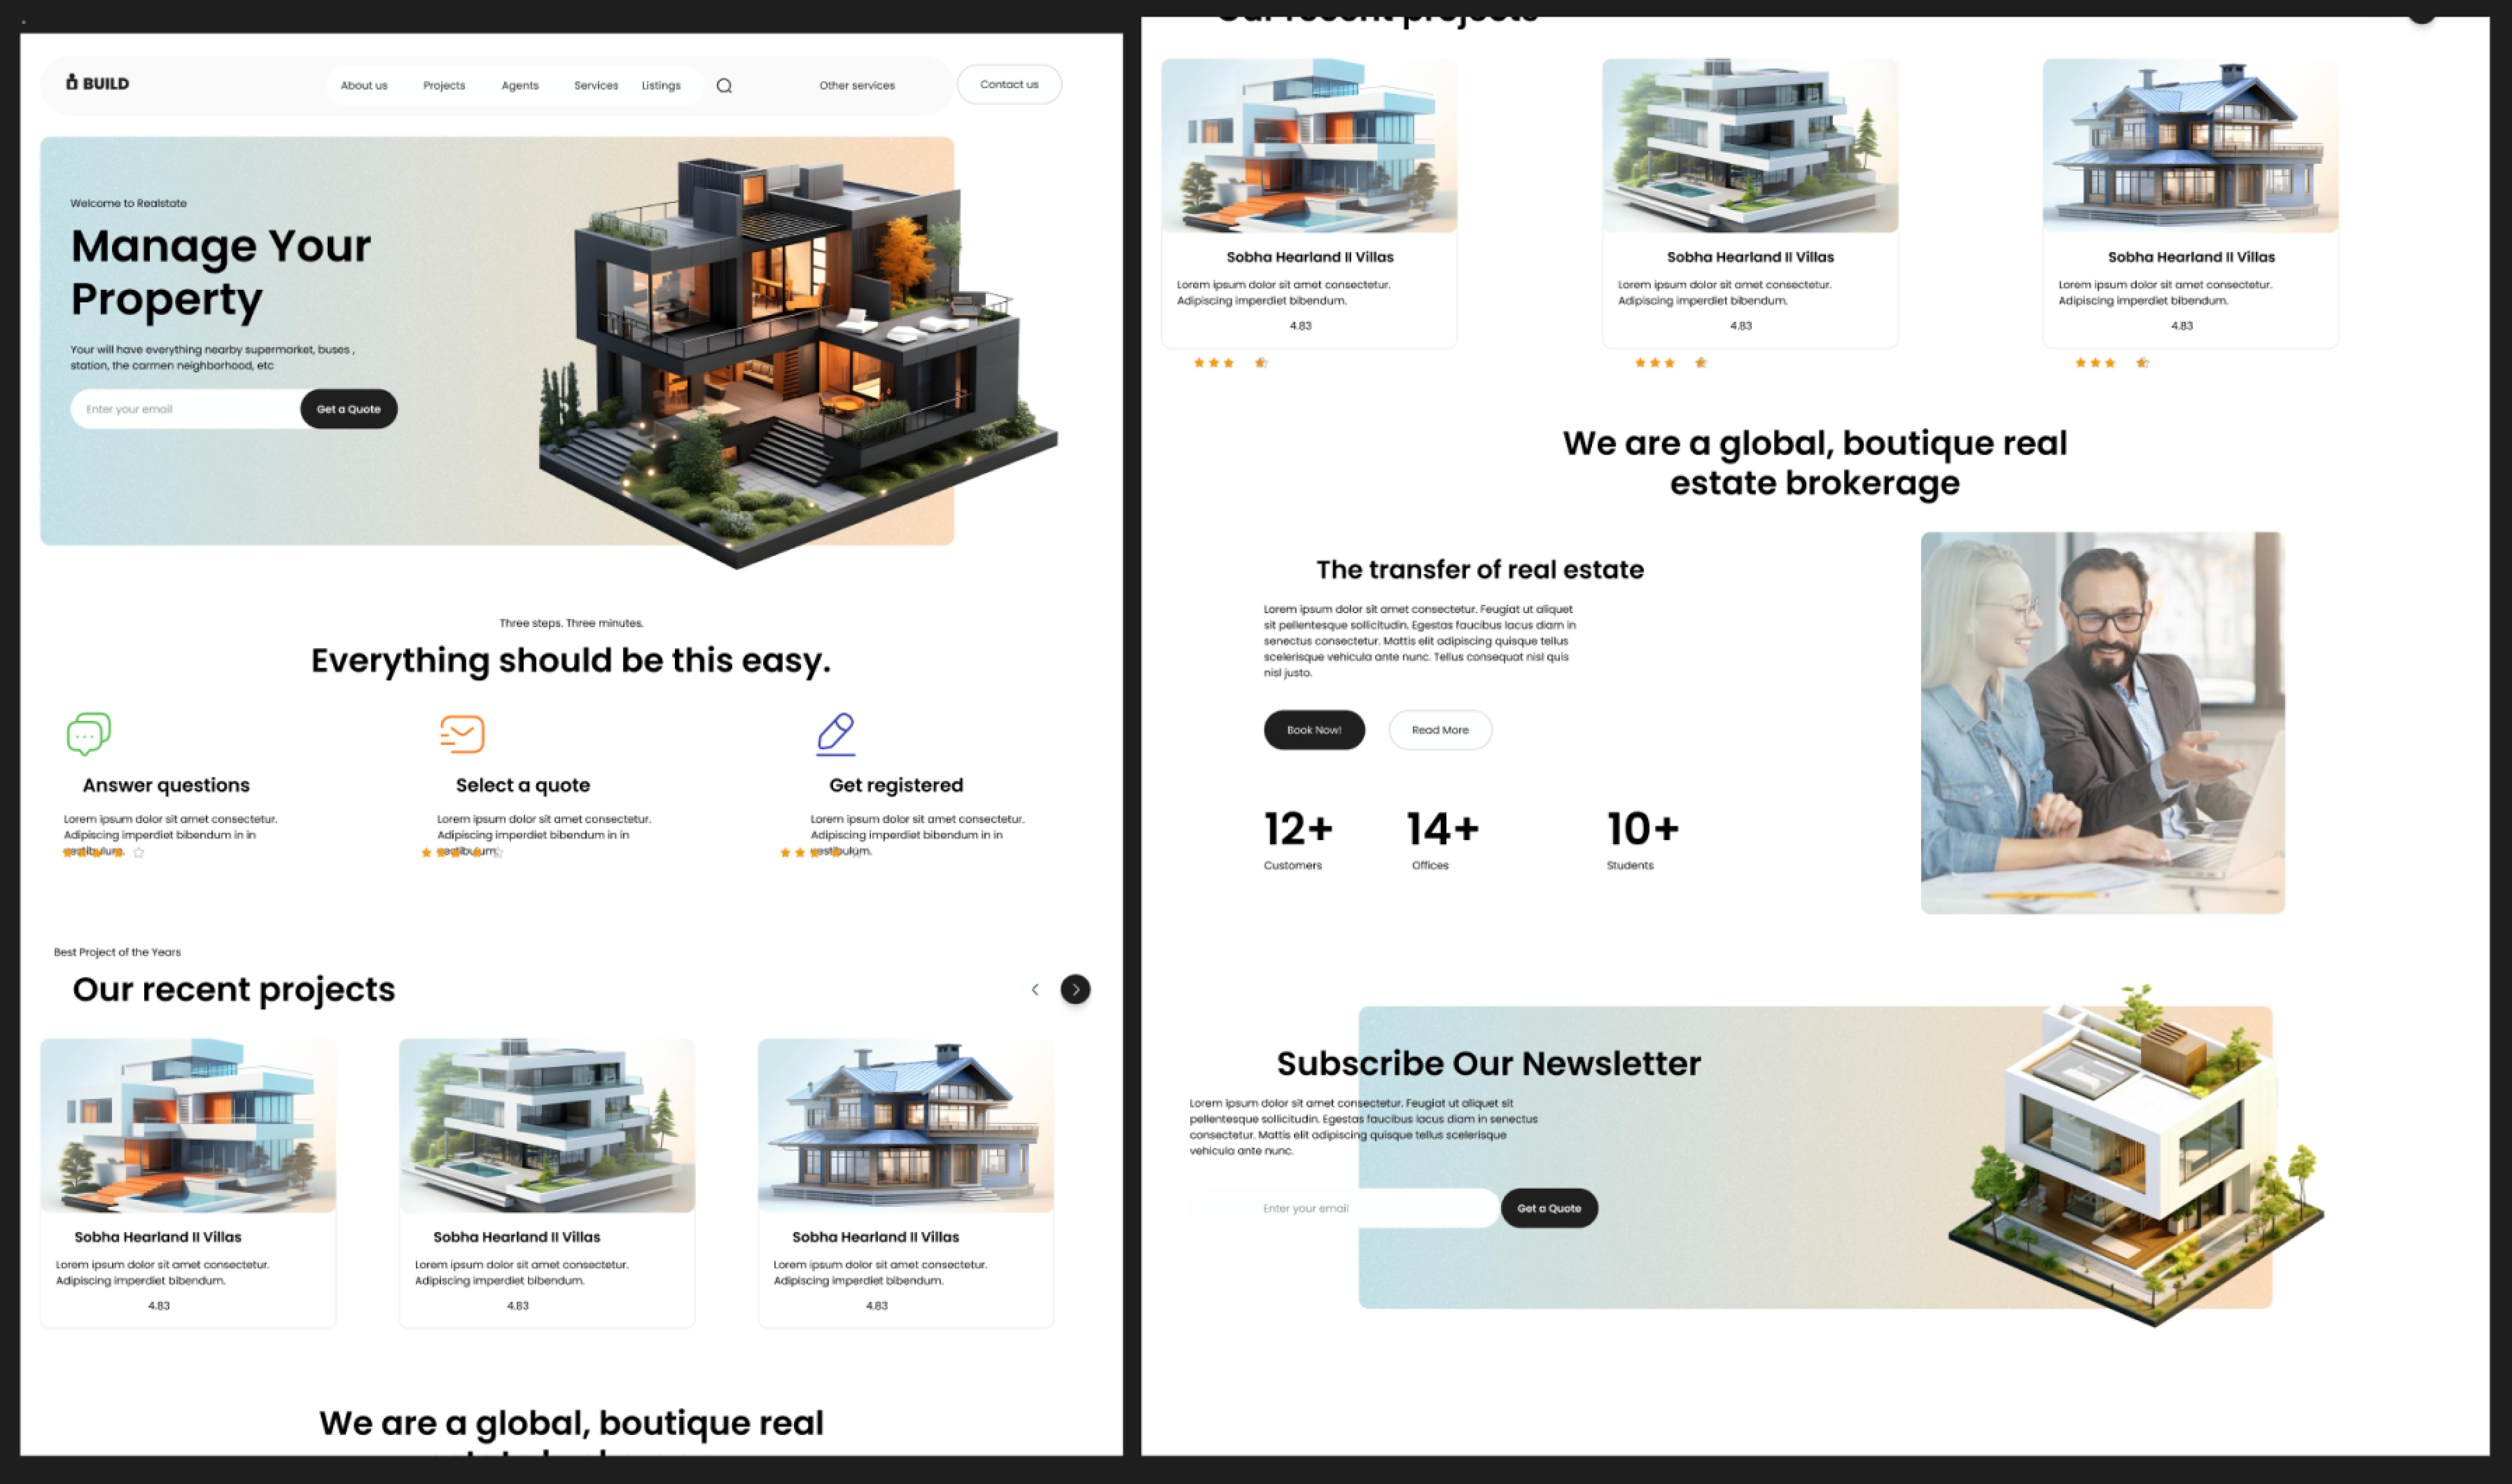
We'll be building a complete responsive real estate website using a single, well-structured Figma frame as our starting point as shown below.
Configuring the Locofy Lightning Plugin for Figma to React Conversion
The Locofy Lightning plugin is located under Figma's Resources tab. Once you activate it, you'll be prompted to choose a framework for your project. We offer popular options like React (which we used here) alongside Next.js, Gatsby, Vue.js, and even plain HTML/CSS. You can also pick your preferred styling approach, from TailwindCSS and CSS-in-JS to inline styles, depending on your project's needs.
Project Setup for This Design:
For this specific real estate website design, we opted for React as the framework, along with TypeScript for a more robust typing system and CSS Modules for better code organization.

Lightning Fast Code Generation
As we set up the framework, styling, and code settings, our next step involves selecting the frames within our design file. After selecting the frames all we have to do is click Let’s Go. This is where the magic begins:

1. LocoAI starts by optimising our designs by applying best practices to our Figma designs for cleaner, and more responsive code. It intelligently cleans up unnecessary elements, groups items logically, and fixes any spacing inconsistencies. This ensures that our code is clean, responsive, and ready to be used on any screen size.

2. Next, LocoAI turns the static layers on our Figma design files into interactive elements like buttons, input fields, and more. LocoAI also analyzes our Figma prototype to implement dynamic functionalities like navigation and popups.

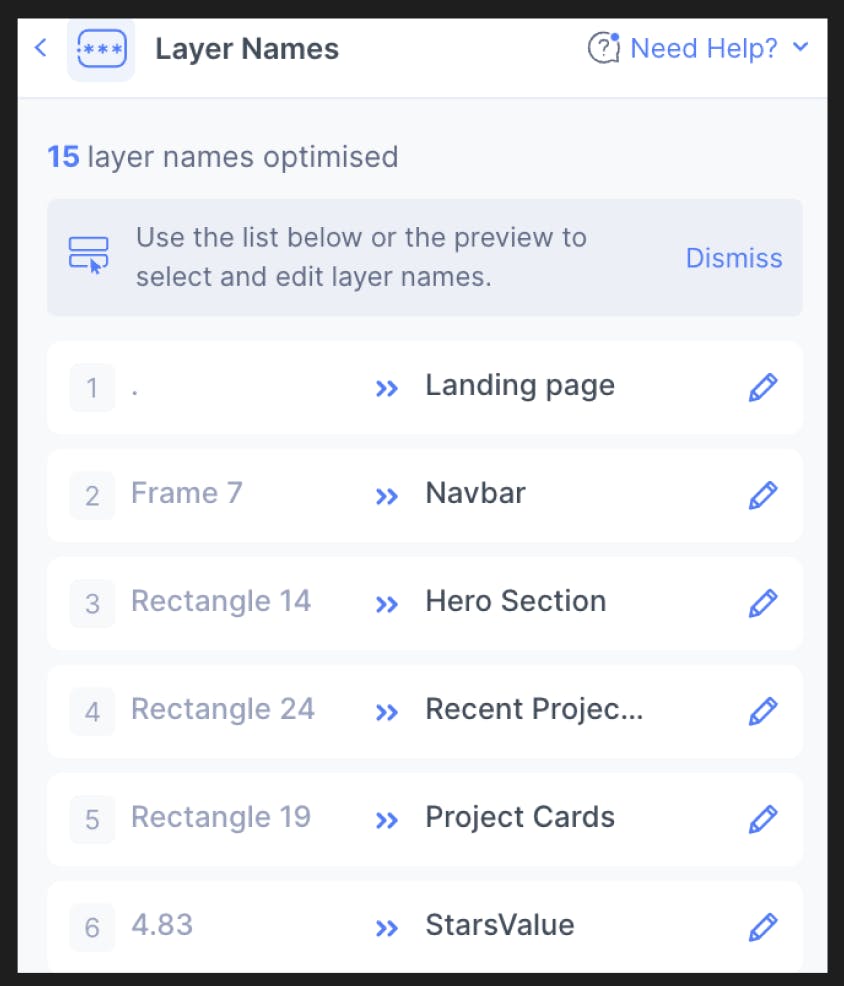
3. LocoAI generates appropriate layer names so the code is human-readable. By using these user-friendly names, it generates names for classes that make it easier for developers to understand and extend the code.
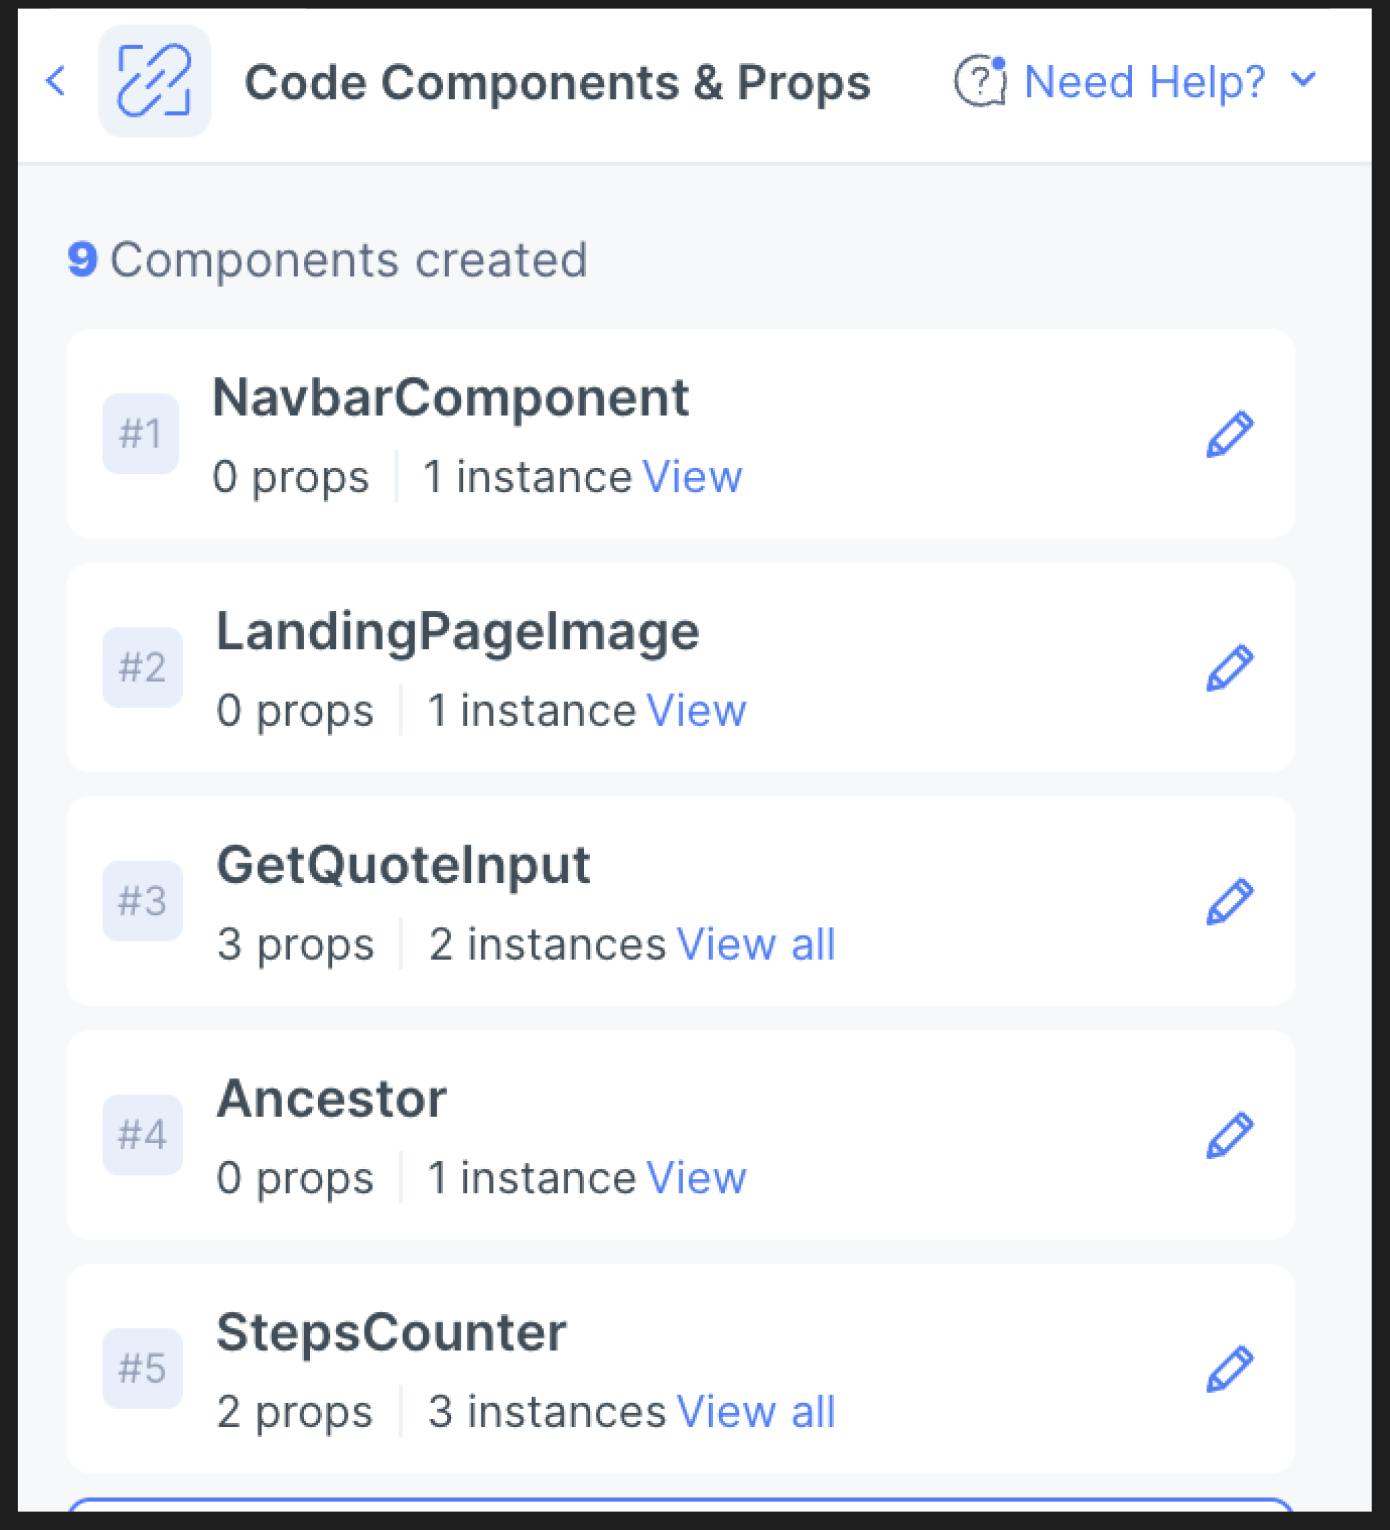
4. Finally, LocoAI creates reusable components with props for modular and maintainable code.
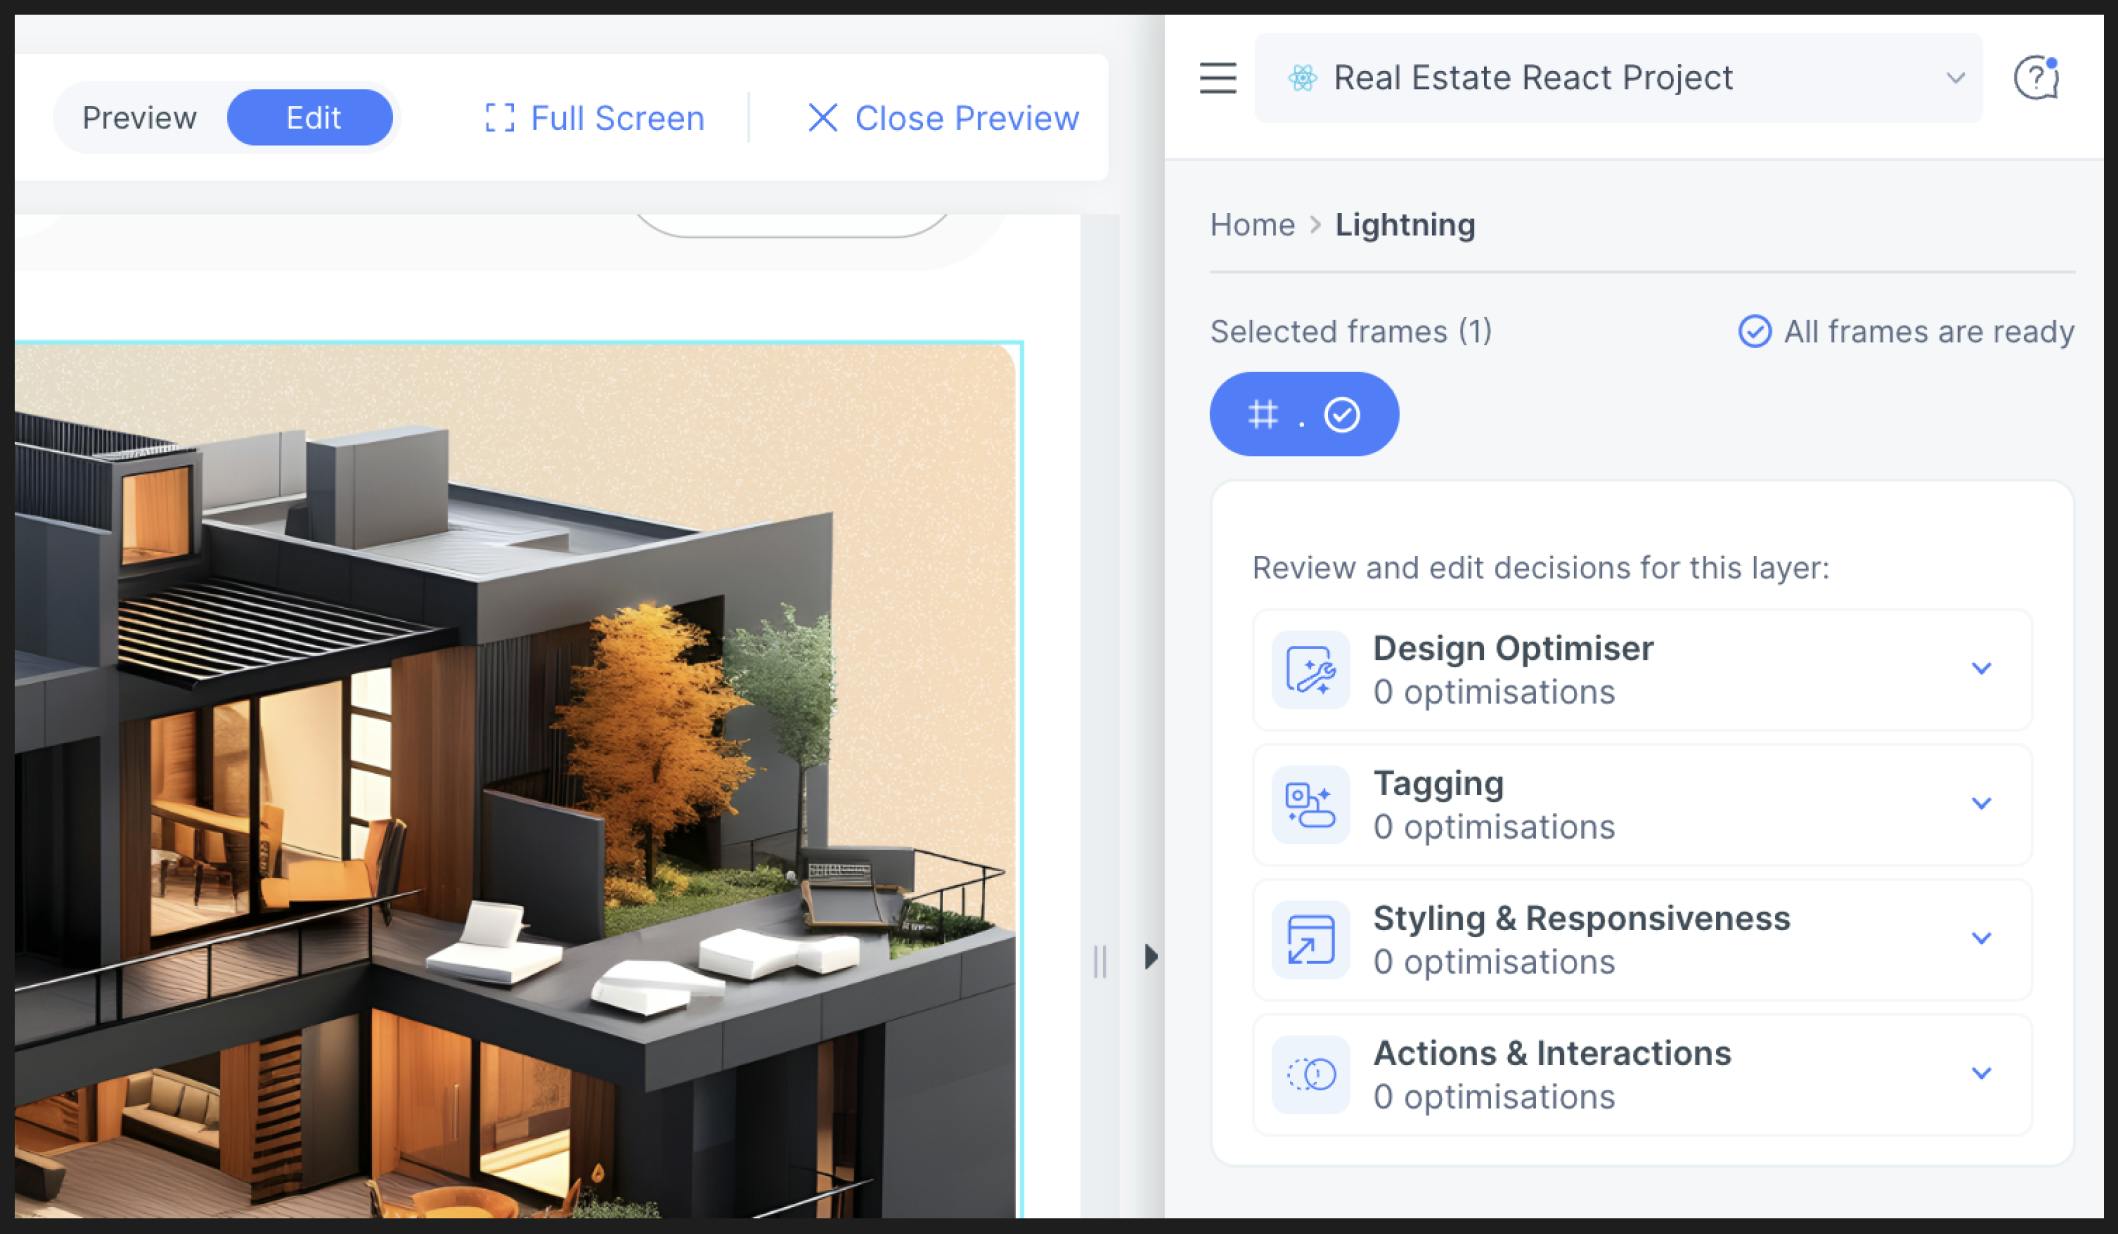
Live Interactive Preview with Fine Tuning
Locofy Lightning doesn't stop at code generation!
After the lightning-fast process, we are greeted by a live interactive preview of our website along with the generated code. This lets us see our design come to life with real-time styling, responsiveness, and interactive elements.
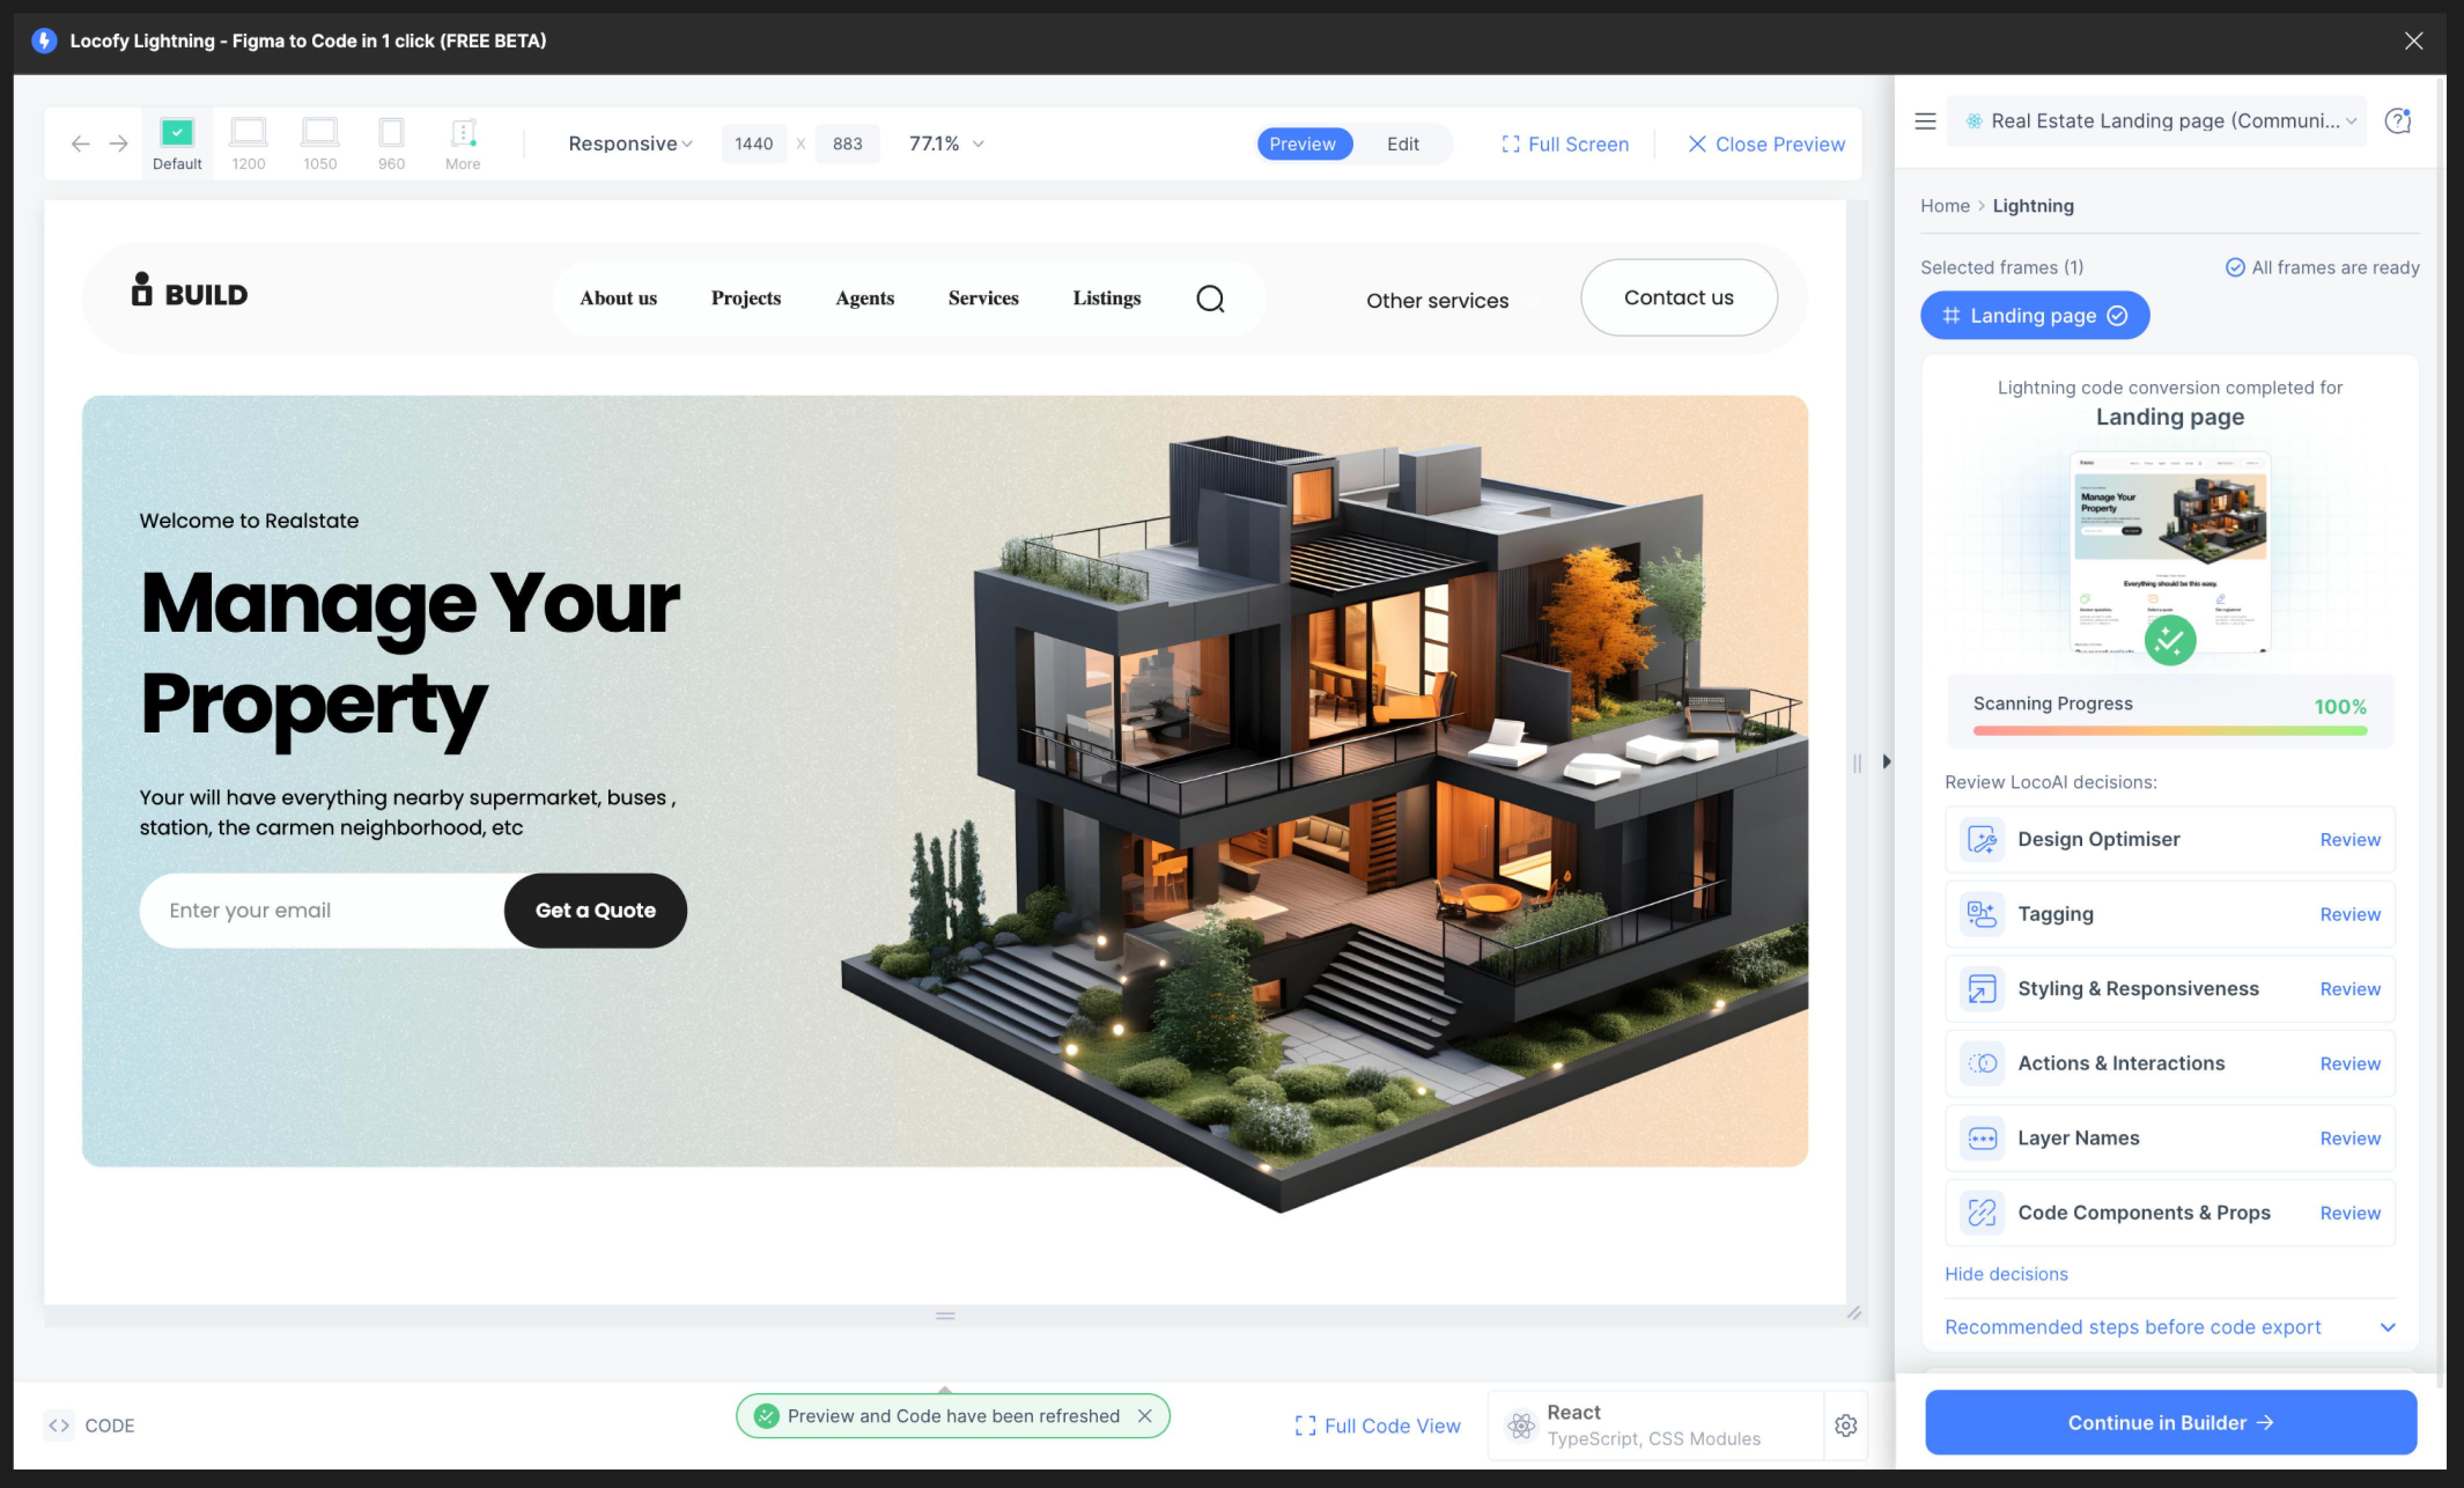
While LocoAI does a fantastic job at interpreting our design and generating code, we still have complete control over the final product. The edit mode allows us to review all the decisions made by LocoAI, and with a simple click, we can fine-tune any aspects of the code before syncing it with the Locofy Builder for further customization. This would include things such as tweaking responsiveness for the header, or the scroll and so on. This ensures that we get a website that perfectly reflects our vision.
For this project we tweaked some styling for the property cards as well as some component names for better readability and simplicity.
Let’s Sync to the Locofy Builder
Once we are satisfied with the generated code, we can sync it to the Locofy Builder. The Builder is a platform that enables you to modify your code settings, create components, and bind data before integrating it into your CI/CD pipelines.

In our design, we have different cards that are being repeated, and LocoAI has already split our code into reusable code components with props. We also have the option to manually add components or edit/detach a component.

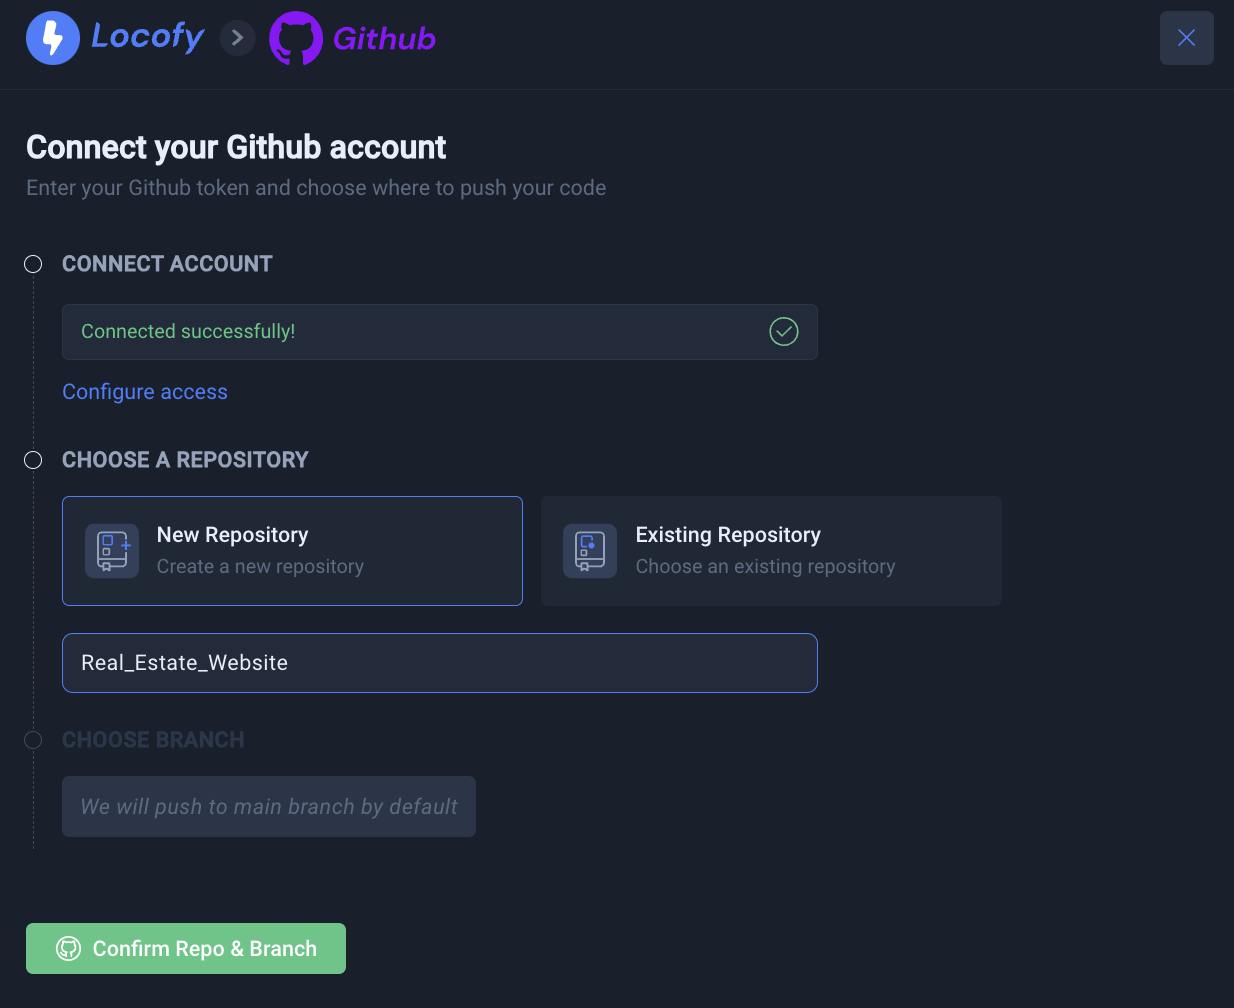
Exporting & Running the Code Locally
Now, for the specific requirements of this project, we would be syncing our code to GitHub. The Builder smoothly links with our GitHub account, making it easy to move from designing to creating a fully functional webpage. We can either create a new repository or sync the code to our existing repository too.
After having successfully created the repository for our entire React codebase of the Real Estate website, we can now proceed to clone it onto our local machine. Following this, just a few simple steps are required to run it locally:
- To run the app, you need to first install the packages running the "npm install" command in your terminal.
- Once the dependencies are installed, you can run the project in the development environment using "npm run start".
Simply running these commands in our IDE's terminal will launch our newly generated website. This lets us view and test it locally on our machine. For even more features, we can connect it to a separate backend system or integrate it with different APIs. The possibility to scale it are endless.

And that’s it! In this blog, we not only saw how to go from a Figma design to a responsive Real Estate website, but got to learn how LocoAI works behind the scene.
Moreover we learnt how you can edit any decision made by LocoAI in order to customise it based on our vision.
If you want to learn more about how to convert your Figma design to React, React Native, HTML/CSS, Nextjs, Vue, and more, check out our docs. Or explore our solution pages for an in-depth look at how Locofy helps you build apps, websites, portfolio pages and responsive prototypes effortlessly using our low-code platform with seamless AI code generation. Also for more pre-Locofied design templates visit our Figma Community Page.