Create a Chat App with Locofy.ai & Firebase

Goal: Build a Chat Application from a Figma design using Locofy.ai to generate the frontend code, Firebase for adding authentication to our app, and Gifted Chat as our chat UI library.
Prerequisites:
- You will need your design ready in Figma.
- You will need a Locofy.ai account and have the plugin up and running on your Figma file.
- You will need a Google account to sign in to Firebase.
Turn your designs into frontend code with Locofy.ai
This is the design for the chat app that we’ll be building. It consists of 5 screens – sign up, login, contact view, chat view and chat room. You can find the link to the Figma file here.

The first step is to tag our designs. Tagging allows us to turn our designs into working components, for example, buttons, dropdowns, inputs, and more.
You can also work with popular UI libraries such as Material and Bootstrap by tagging your elements.For this app, you’ll notice items like:
- Buttons
- Input fields
- Bottom tabs
- Modal
Now you can make your designs responsive by configuring the styles in the Styles & Layouts tab.
Select your components that need to be responsive and on the Locofy plugin, under the Styles & Layouts tab, you will find different media queries & states. Select the breakpoint you want to make your design responsive to and then change the styles and layout accordingly.
You can also use auto layout for your designs for responsiveness and use the locofy plugin to take care of layouts on different screen sizes.You can trigger actions to build fully featured apps and websites. You can head over to the ‘Actions’ tab and assign actions for click events.
You can scroll into view and open popups and URLs amongst other actions.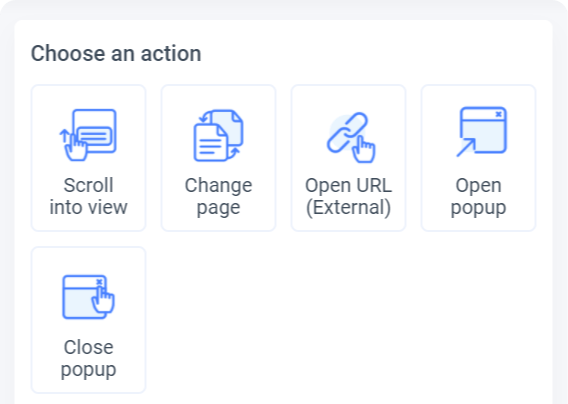
Now that our designs are tagged correctly and responsive, we can preview them.
To preview your design, select the frame or layer that you want to view, and click the “Preview” button.
Once you are satisfied with your preview, you can sync your designs to Locofy Builder to add more advanced settings, share your live prototype, and export code.
Click the “View Code” button at the bottom right corner of the plugin & select the frames. In our case, we’ll be syncing all the frames.
Once the sync is complete, click on “View code in the Builder”.You need to turn some of the code generated by Locofy into components inside the Locofy Builder for easier maintenance and fewer duplicate code.
In our design, since the contacts are being repeated in the Contact View screen, we should convert it into a reusable component. We can do that either by using the Locofy Components Wizard which gives us recommendations for components and adds props automatically.

Or we can also add components manually as shown below.

You can also add the props quickly in the Locofy builder so you can easily extend it.
Once the prototype matches the product vision, you can view the live responsive prototype that looks and feels like your end product. Then you can export the code.

Make sure to select all the screens you need, as well as the React Native framework with Expo CLI as the project settings. Once done, you can download your code in a Zip File by clicking the “Confirm Export” in the bottom right corner.
Exported Code Overview
After extracting the zip file you downloaded, you can see how the React Native project is structured.

You can see the components you created in the Locofy builder have been placed inside the components/ folder and you have got our screens as pages inside the screens/ folder.
- To run the app, you need to first install the packages running the "npm i" command in your terminal.
- Once the dependencies are installed, you can run the project in the simulator using "npx expo start".
Adding Firebase Authentication
To work with the auth service provided by Firebase, you need a Firebase account and the right credentials in place. To learn how to create a Firebase account and set up the project, please refer to this guide on extending React code with Firebase's auth service.
Once everything is in order, you would have a firebase.js file in your root folder that will look something like this:
Now open the 'SignUp.js' file and paste the following code to handle the email and password state variables:
Let’s modify the onPress function in the touchable opacity button and call onHandleSignin() function. The user will navigate to ‘Contact View’ screen after signing up.
We initialise the onHandleSignin() function:
We now define the setEmail and setPassword functions and add these as props in the SignUpCard page:
We now go to the Components/SignUpCard and use the props inside it. For the text input, we call the onChangeText() function:
We can now register our new users with Firebase.
Now let’s move to the login screen. Open the 'Login.js' file. Add the two useState hooks for email and password like we did for the sign up page:
Let’s modify the onPress function in the touchable opacity button and call onHandleLogin() function:
We initialise the onHandleLogin() function:
We repeat similar steps for the Login screen as Sign up.
Once done with the Login screen, we'll modify the root file app.js. Since the authenticated user needs to pass through all the pages and screens, we need to use the React createContext API . We create a context called AuthenticatedUserContext in app.js:
Finally, we create an authenticated user provider which provides the context to the child components.
Sending Messages
We will be using the Gifted Chat UI library which will give us a chat component that we can integrate with our application. The library handles some of the common operations associated with displaying messages.
To install the library, run the following:
We need a state hook to store our messages in an array:
In order to fetch the already existing chats from Firebase, we use the useEffect hook to run a function once. The function will essentially query the Firestore database’s collection and sort it based on the latest messages. When the component is destroyed, we are using an onSnapshot function to make sure our message logs are completely synced up.
Finally, we create an authenticated user provider which provides the context to the child components.
And with that, you have created your own chat app with authentication!
By following the steps above, you can turn your designs into production-ready React Native code with the ability to authenticate & message users, thanks to Firebase’s auth service and Firestore.
With the Locofy.ai plugin, you will be able to generate pixel-perfect frontend code that can be broken down into components that can accept props and pages.
If you want to learn more about how to convert your Figma design to React, React Native, HTML/CSS, Nextjs, Vue, and more, check out our docs. Or explore our solution pages for an in-depth look at how Locofy helps you build apps, websites, portfolio pages and responsive prototypes effortlessly using our low-code platform with seamless AI code generation.