How To Deploy a Full-Stack Nextjs App With AWS Amplify

Deploying a Next.js application can be a daunting task for developers if you are not using Vercel. But with Amazon Amplify, you can easily and quickly deploy your app without sacrificing key functionalities such as ISR, SSR, and other Next.js goodies.
That is what we will be learning in this post.
Here, we will guide you through the entire process of using Amazon Amplify to deploy your full-stack Next.js application. We will start by setting up the development environment and walking through the deployment settings to ensure that the app is tailored to our specific needs.
With that kept in mind, let’s get started.
Building Scalable Web Apps with Next.js and AWS Amplify: An Overview
First and foremost, Next.js is a React framework that adds structure, functionality, and optimizations to your application. It's fairly popular in the developer community these days.
AWS Amplify, on the other hand, is an AWS-provided package of services meant to make your life simpler.
You'll have everything you need to streamline your backend and cloud-connected frontend UIs, and even have a fully managed CI/CD and hosting service for fast, secure, and reliable static and server-side rendered apps that scale with your business with four groups of services, namely Amplify Studio, Amplify CLI, Amplify Libraries, and Amplify Hosting.

It uses the AWS cloud infrastructure's elastic computing capabilities to give nearly infinite scalability and dependability and has CLI and library support to easily integrate backends with authentication features, among other benefits.
Now that we've learned about Next.js and AWS Amplify, let's see how to deploy your Next.js on AWS infrastructure with Amplify.
Essential Prerequisites
Before we begin deploying our app with AWS Amplify, a few requirements must be fulfilled.
1. Node.js and NPM should be installed on your machine.
2. You should have a basic knowledge of Git and GitHub.
3. Some familiarity with Next.js
4. Lastly, you must have an AWS account.
From Localhost to the Cloud: How to Deploy Your App
Here, we'll create a Next.js app and deploy it as simply as we can by outlining all the key ideas and information you need to know.
To get started, let's take a look at the steps involved in this process:
Create a Next.js App
To get started, begin by creating a Next.js application.
Once you've created the application, select the default options and navigate to the project directory.
Lastly, run the application using the Next.js team's default code.
Before we go any further, let's go over some fundamental Next.js concepts.
When you create a Next.js application, you have various options for producing HTML and we have discussed these options in greater detail in one of our blogs.
With that said, if you are using Static Side Generation, you will need to modify your package.json file in order to deploy a Next.js application like this:
Here, we add "next build && next export" to support SSG pages. This script lets you export your app to static HTML so that it can function without the assistance of a Node.js server.
However if your project uses SSR or a hybrid Next.js approach, then you don't need to make any changes to your package.json file.
Push the Code on GitHub
When you've finished developing your Next.js project, you have to push it to GitHub.
Create a new repository on GitHub and publish the code according to the instructions provided:
Deploy the Next.js App
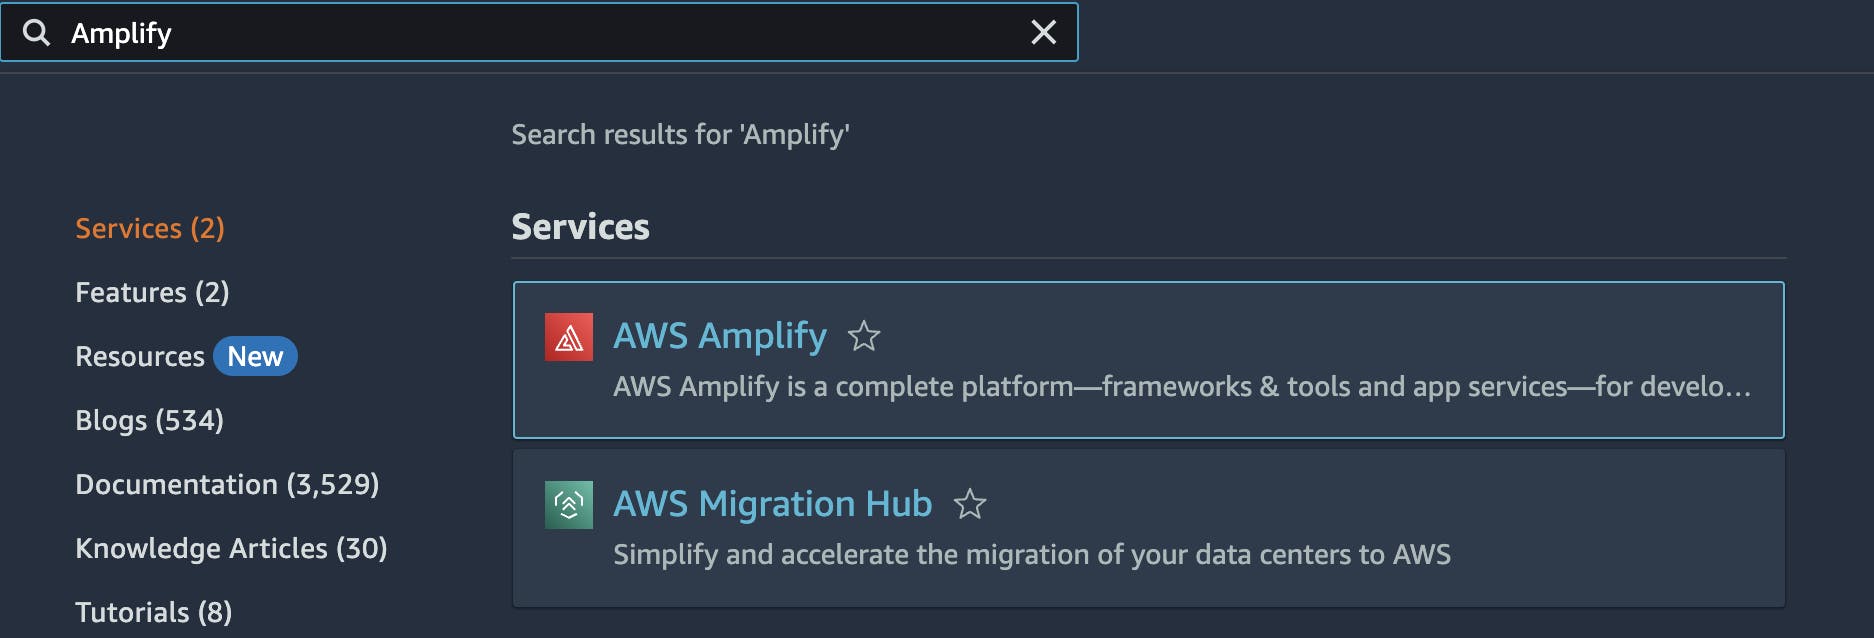
Now, within your AWS account, navigate to AWS Amplify. If you cannot find AWS Amplify, you can search for it by using the search bar present at the top.
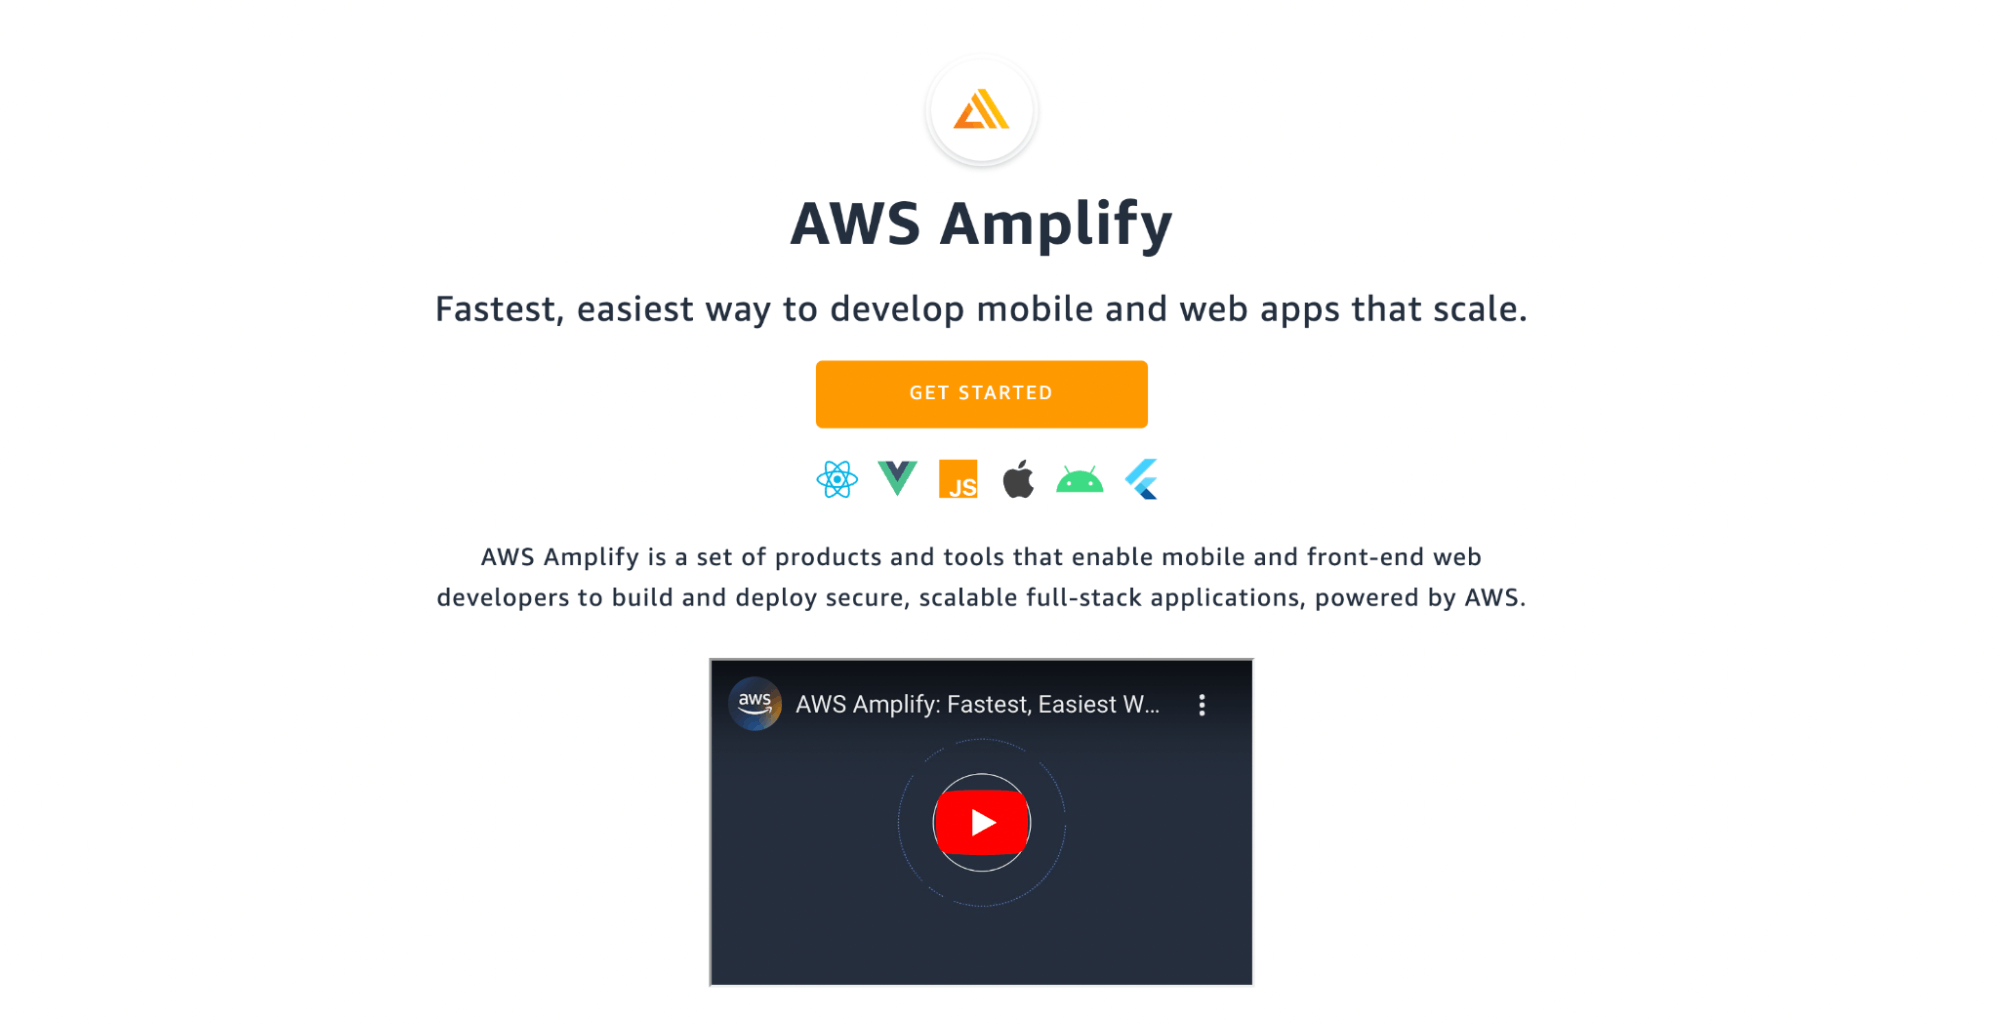
If you are new to AWS Amplify and have not yet created an app, you will see this page; click the "Get Started" button to proceed.
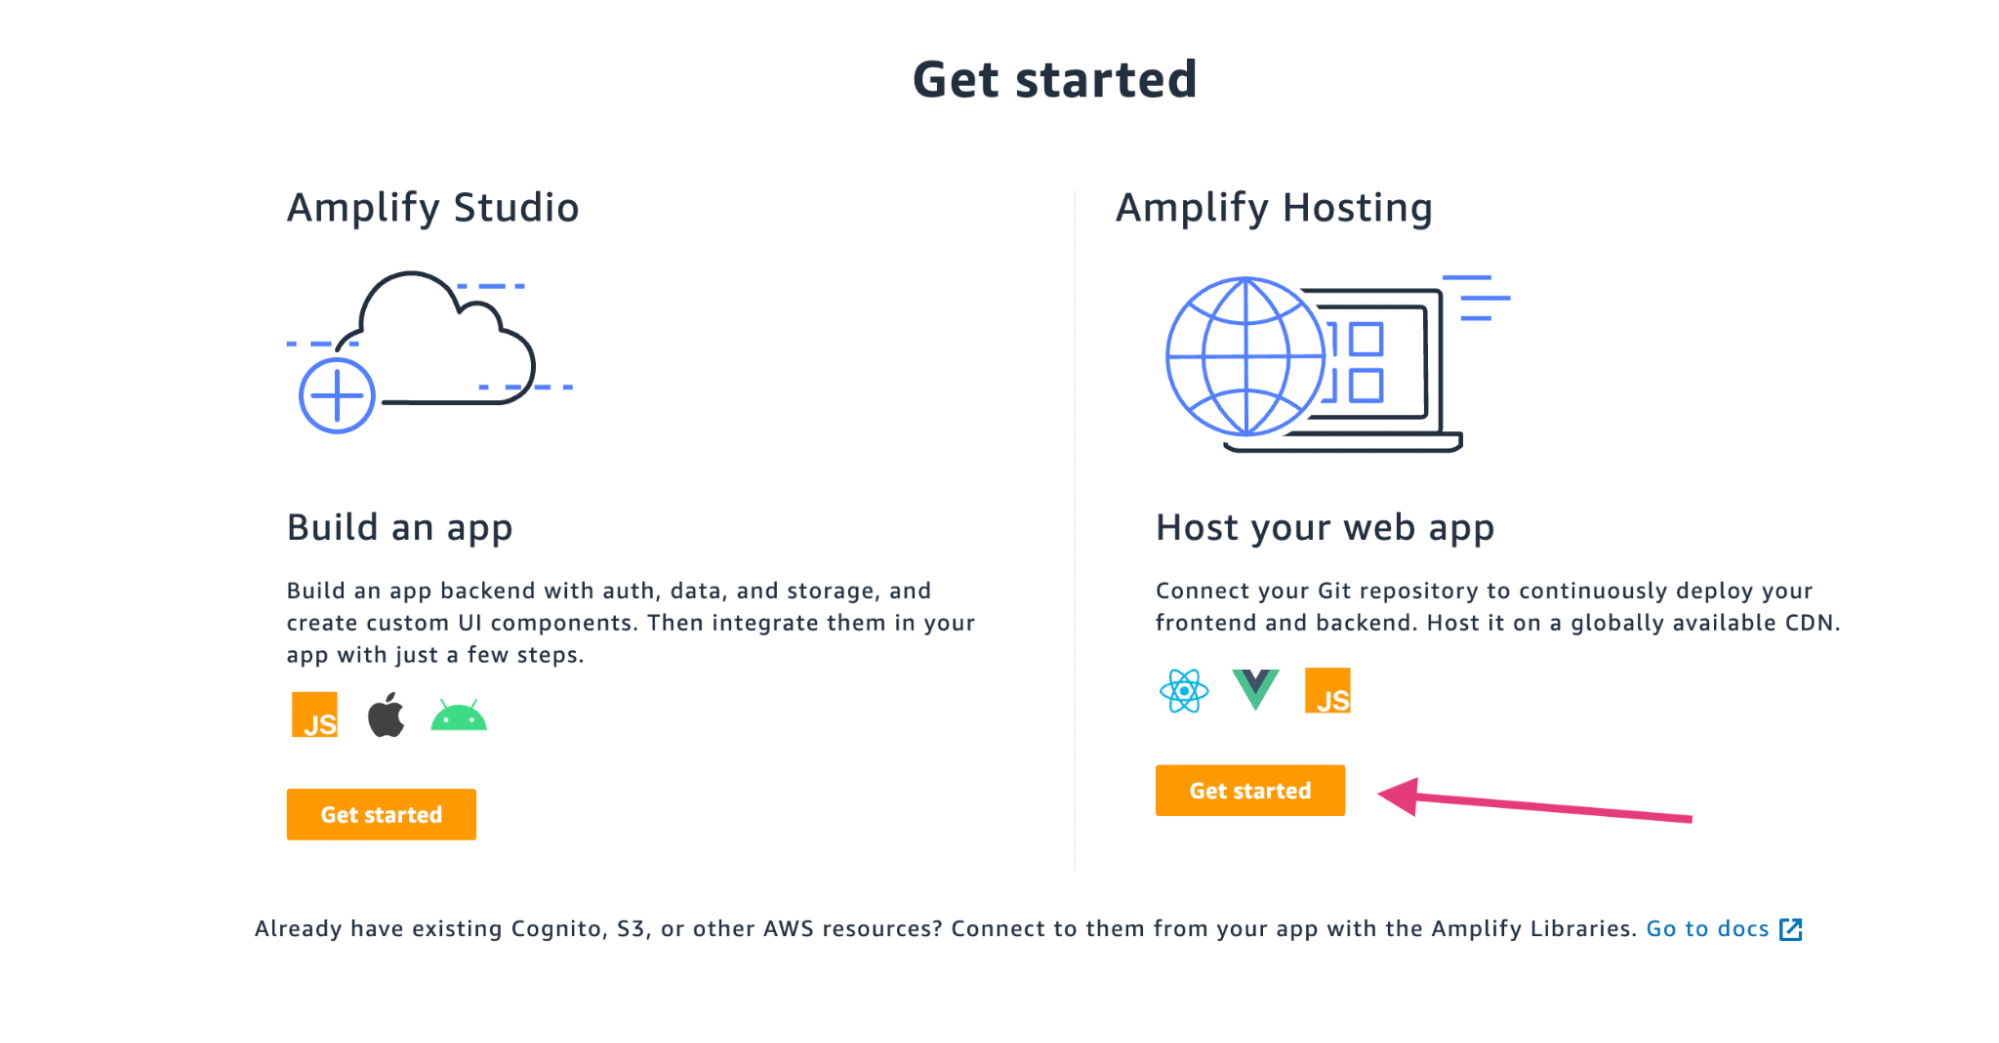
And then it will move down, and under the Amplify Hosting area, click on the "Get started" option.

You can now connect to your source code. We'll be going with GitHub because we've already pushed our code there.
When connecting for the first time, you have to authorize your GitHub account to connect with AWS. Once authorized, you will see the page displayed above.
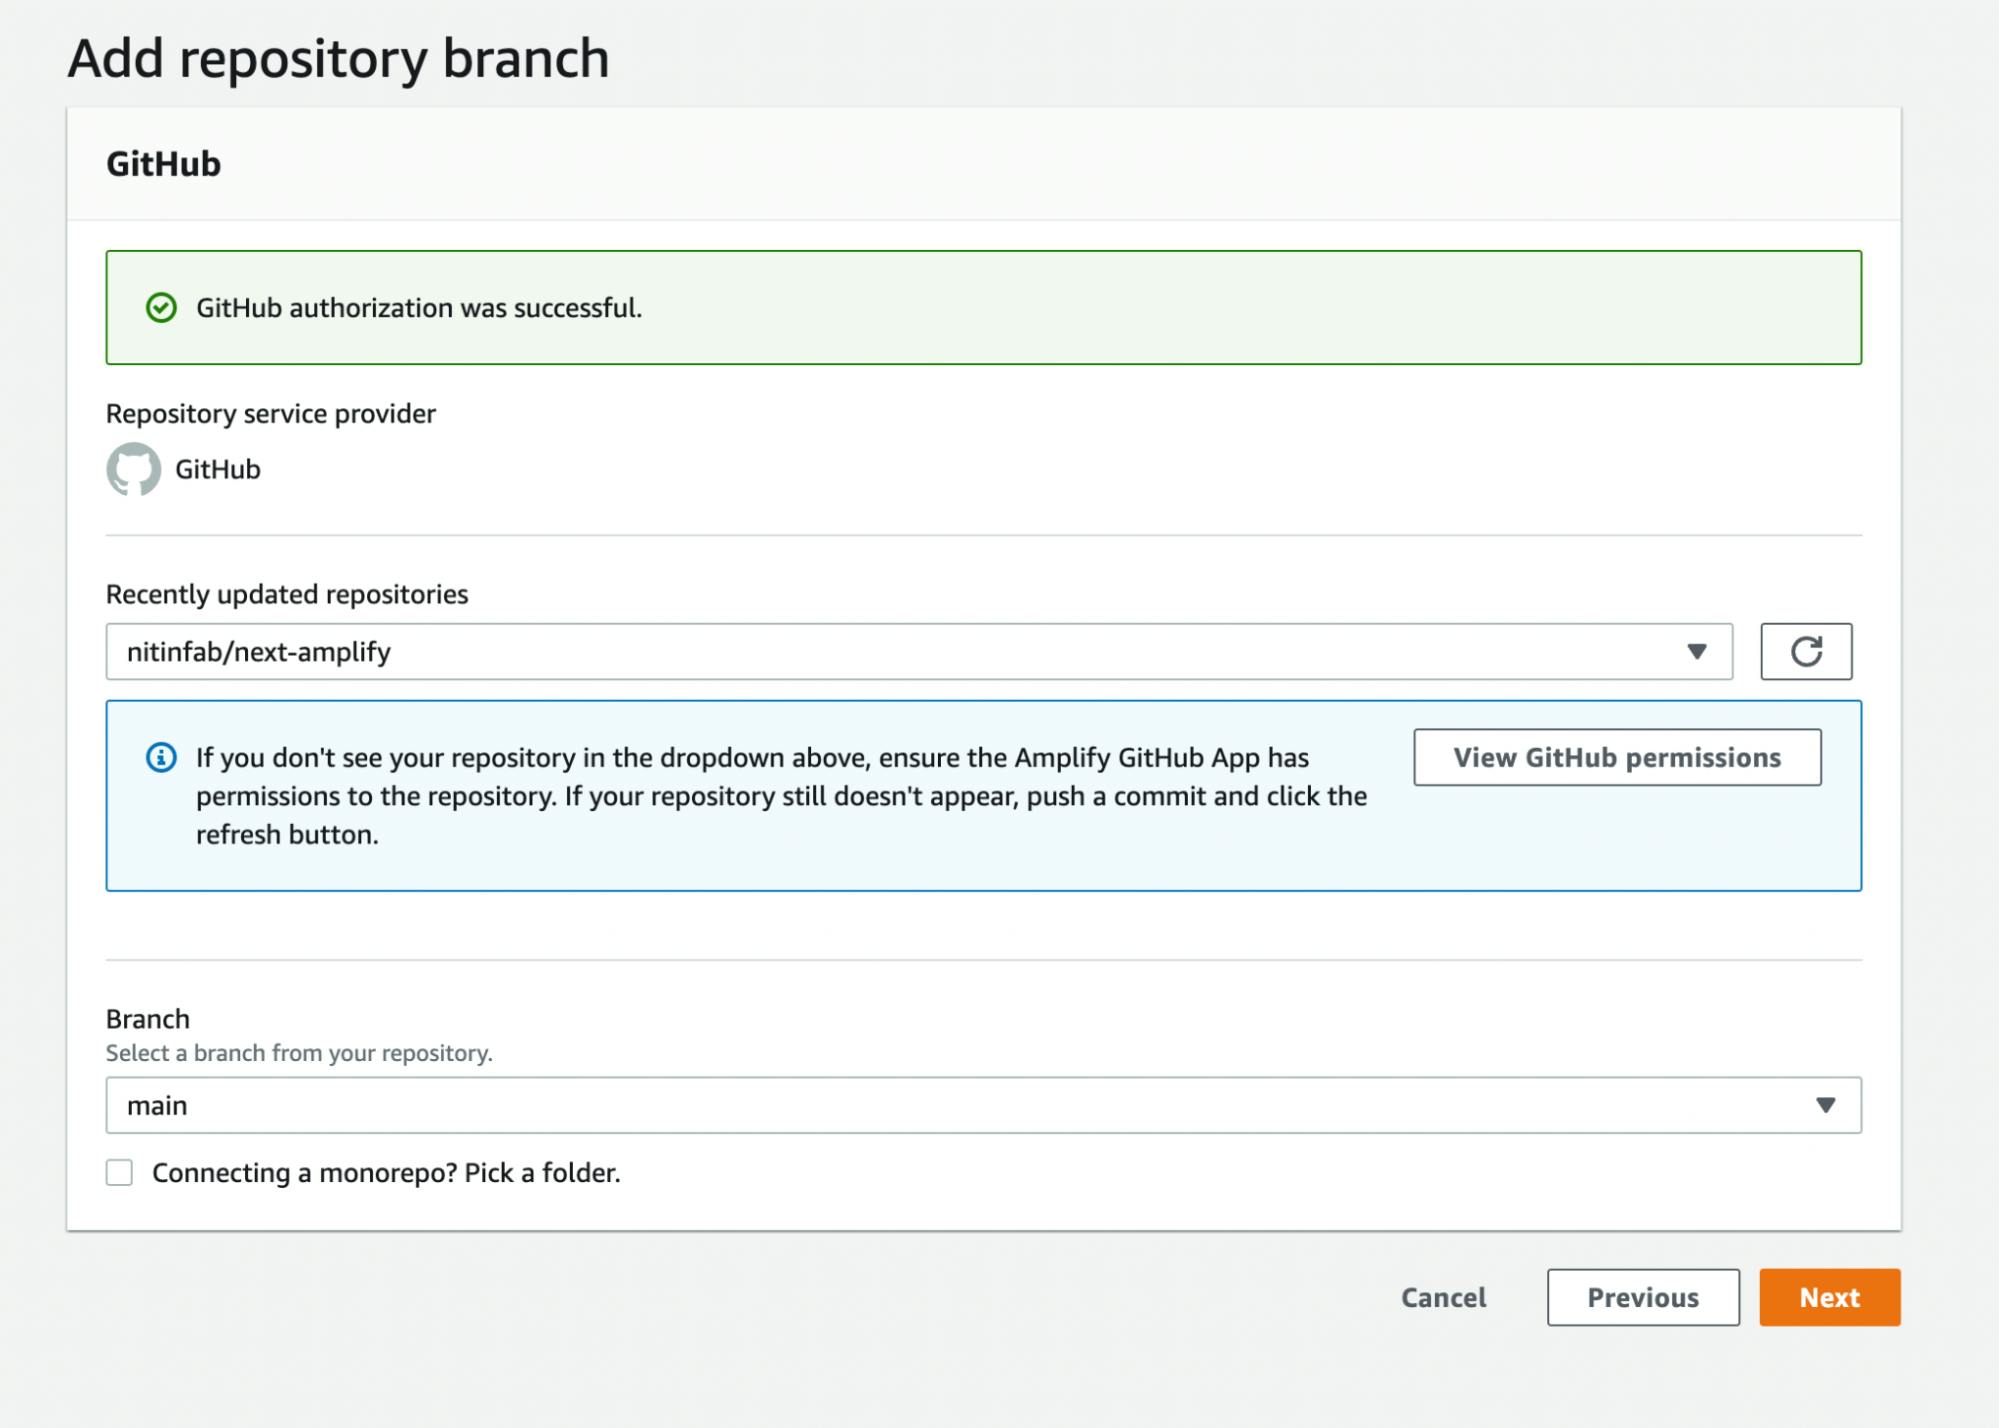
Next, choose a repository. In our scenario, click on "next-amplify," then read the branch name displayed below it (which should autocomplete), and lastly click "next”.

Following that, you'll be taken to the “Build settings” page, where you'll see the name of your app as well as its auto-detected front-end and back-end frameworks.
You may create a new environment and label it "dev" on this page. And then, if you don't see an existing service role, you'll need to create one. To do so, click the "Create new role" button on the blue panel. This will open a new tab on your browser for IAM.
Select the "Next: Permissions," "Next: Tags," and "Next: Review" buttons at the bottom of each page without making any changes, and then click the "Create role" button to complete the role creation.
Close the IAM tab and return to the Amplify Build settings page once you've created the new role. Choose the refresh button and then the newly established role name. Then, to proceed, click the "Next" button.
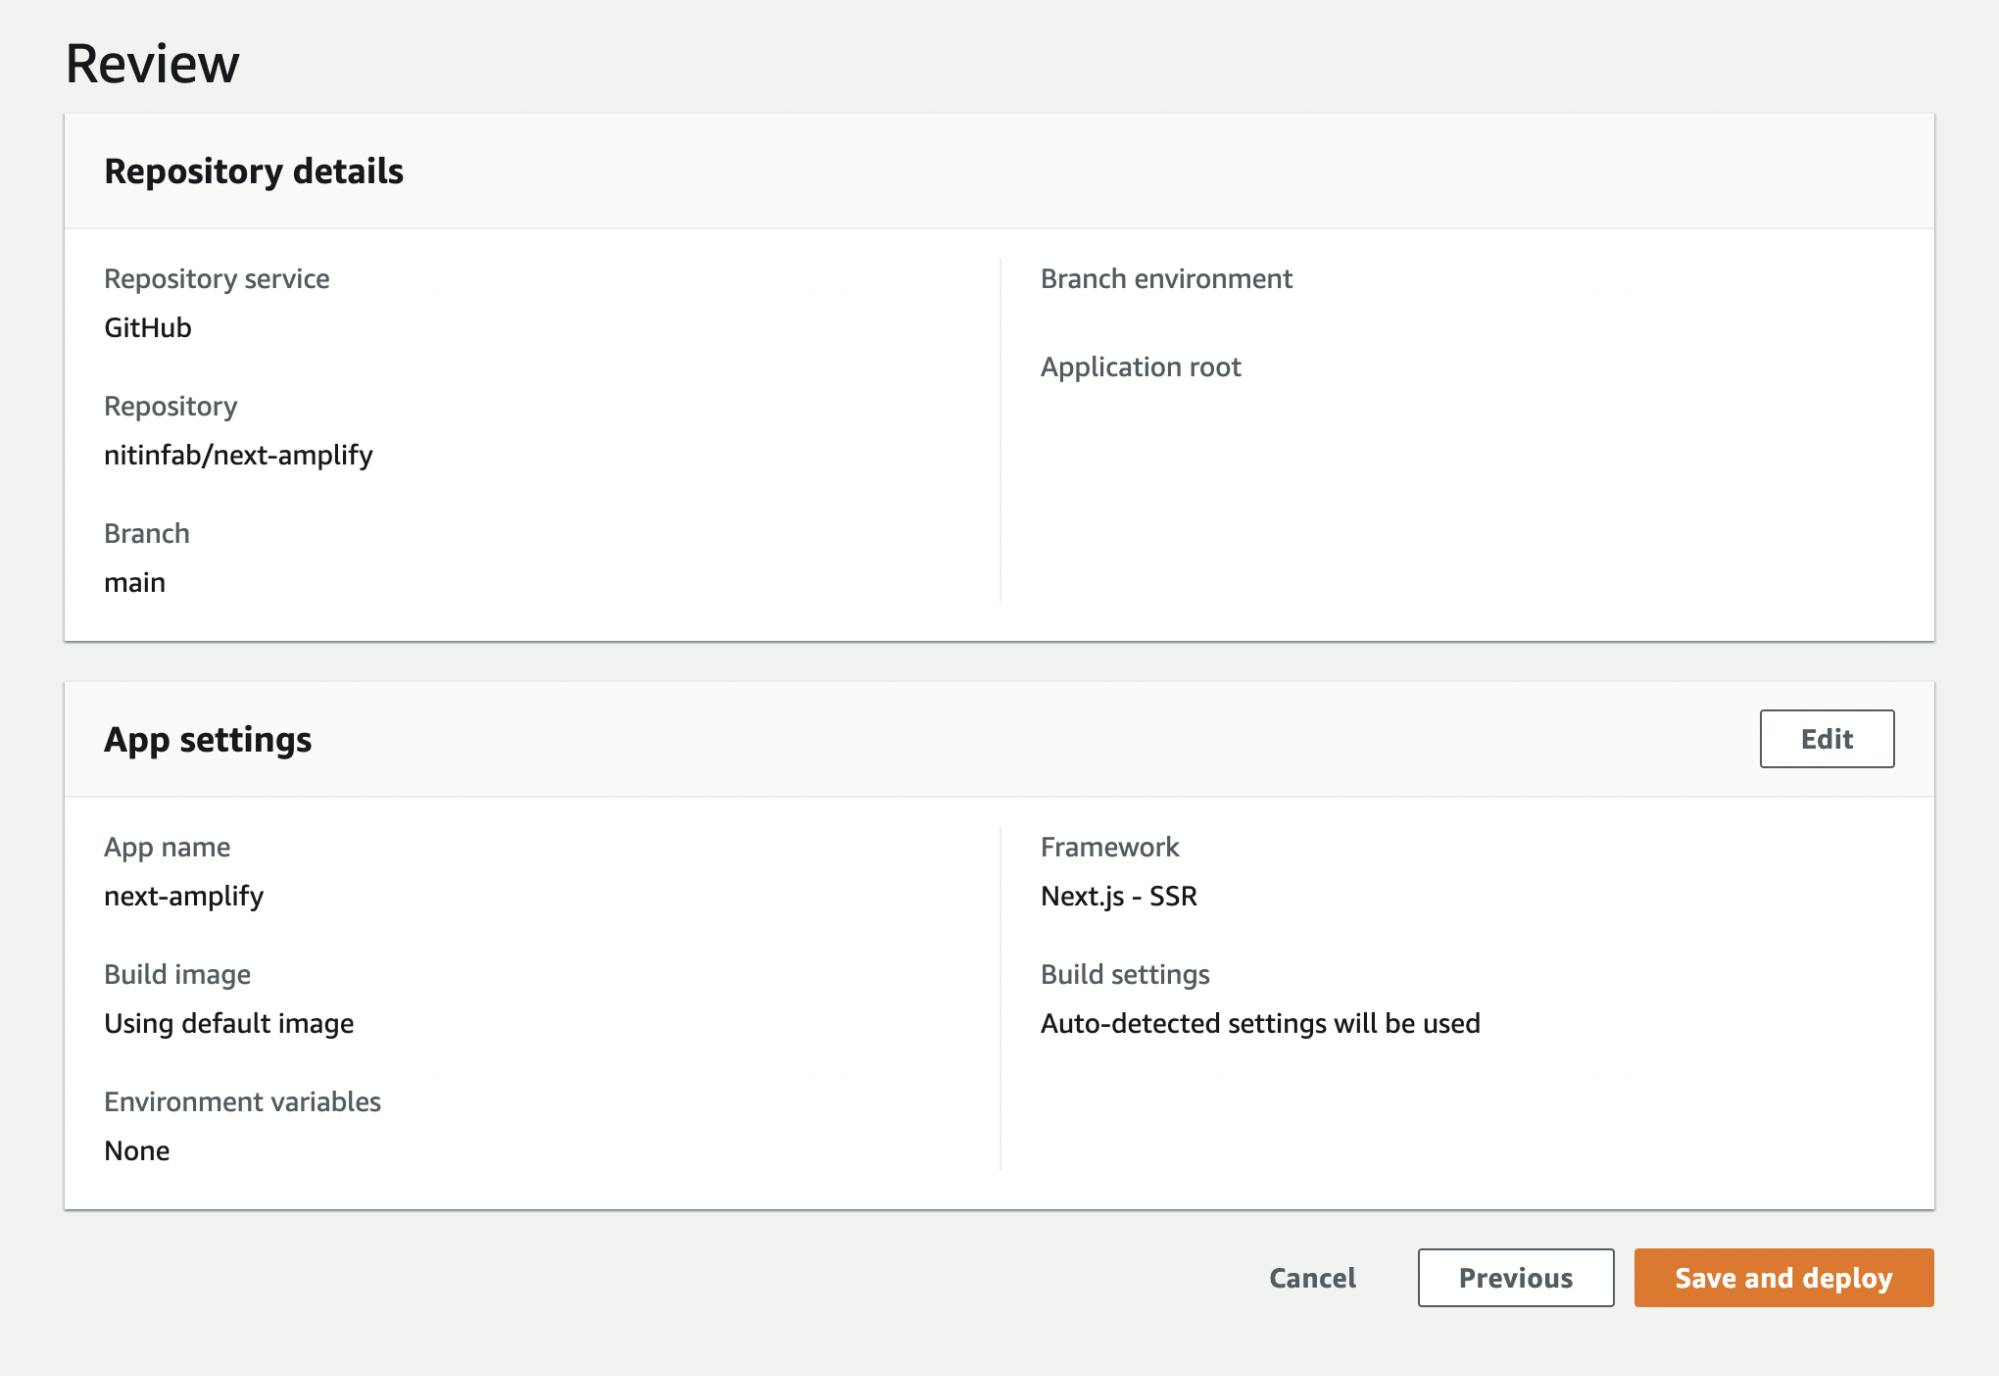
On this page, you can review your app before it is deployed. If everything is in order, press the "Save and deploy" button.
And that's it! It will take some time for the system to be deployed. Then after it's done, click on the link provided to see your Next.js app in action.
Add Authentication to your Next.js App in Minutes with Amplify CLI
As we mentioned earlier, Amplify provides everything you need to streamline your backend and cloud-connected front-end UIs.
To make the process even simpler, there is another tool available: the Amplify CLI. This tool allows you to easily add authentication or integrate APIs into your Next.js app.
Before using Amplify, execute "amplify init" to initialize it.
After that, all you have to do is use the command "amplify add auth" to set up authentication resources in your AWS account (select the default configuration).
You may use the "amplify push -y" command to publish the updated code to the Amplify project after making the necessary code modifications to provide the authentication capability.
Let's use the Amplify package to create a functional Authentication UI. To do so, you'll need to install the following dependencies in your Next.js app.
Now, replace the existing code in the pages/_app.js file with the following:
And then replace the code inside the index.js file:
Here, we have added the "withAuthenticator" function from the "@aws-amplify/ui-react" library to add authentication functionality to the "Home" component. The "Home" component receives two props - "signOut" and "user" - which are used to display the user's username and a button to sign out.
The "withAuthenticator" function is a higher-order component that wraps the "Home" component and provides authentication capabilities such as login, registration, and password reset. The "export default" statement exports the "Home" component wrapped with the "withAuthenticator" function, which means that any component importing and using "Home" will automatically have authentication functionality.
And to add user sign-up and sign-in features, it uses Amazon Cognito.
Here is the output:
Maximizing Performance and Scalability with CloudFront, Lambda@Edge, and DynamoDB for Next.js Apps
So far, we have covered how to deploy your app using a step-by-step guide and even discussed how to add authentication, API, and hosting through the Amplify CLI.
However, it's important to note that you have access to a variety of Amazon services beyond just the deployment process. Among these services, some of the most useful are Amazon CloudFront(CDN), Lambda@Edge, and DynamoDB, each of which can assist your application in different ways.
For instance, let’s quickly take a look at the steps for integrating DynamoDB within a Next.js app.
- Create an IAM user with DynamoDB full access.
- Install the AWS SDK for JavaScript.
- Set up environment variables in a .env file.
- Create a DynamoDB table and then set up a DynamoDB client in a separate file.
- Use DynamoDB in your Next.js app by importing the client and calling DynamoDB functions.
Similarly, you may utilize a number of other services with your Next.js app.
While AWS Amplify helps with deployment and extending the code, you still need a frontend ready to be extended and turned into a fullstack app. For this, you can use the Locofy.ai plugin to generate modular, and highly extensible Next.js apps directly from your Figma & Adobe XD design files.
You can use the auto layout feature on Figma to make your designs responsive on the Locofy.ai plugin and even if your designs don't utilise auto layouts, the plugin offers a Design Optimizer feature that uses AI to apply auto layouts to your design files. Once your designs are responsive, you can use the Auto Components feature to split your design elements into working React components, making them easy to extend.
If you want to learn more about how to convert your Figma design to React, React Native, HTML/CSS, Nextjs, Vue, and more, check out our docs. Or explore our solution pages for an in-depth look at how Locofy helps you build apps, websites, portfolio pages and responsive prototypes effortlessly using our low-code platform with seamless AI code generation.